This article was last updated during version 1.5.6. The game is now in 1.6.2. Some information may be out of date. Help us keep the wiki up to date by comparing this article against the patch notes and updating it.
Overview
Buildings are your main way of meeting the needs of your Villagers by way of gathering, farming, production, housing, and consumption. They occupy map tiles, constrain the movement of Villagers, and offer a variety of capabilities to help your settlement survive. Some Buildings have a limited distance within which they are effective, for example, for gathering  Wood from trees.
Blueprints

The Reputation icon shimmers when you can choose new Blueprints.
Which Buildings you have available for construction is determined by which Blueprints you have in your settlement. During each mission, you can choose additional Blueprints by gaining Reputation, completing Orders, buying from Traders, and from Glade Event rewards. Once you gain a new Blueprint, you are allowed to build that Building as many times as you can afford—until you move on to the next settlement. You will then have different choices and rewards.
Essential Blueprints
Every Viceroy has a list of Essential Blueprints, and you will begin each settlement with all of those Blueprints, meaning those Buildings start unlocked.
You can choose more Blueprints to be Essential by completing Deeds and buying upgrades in the Smoldering City. Some upgrades in the Smoldering City also add Blueprints to your list of choices when Embarking.
You can learn about your starting list of Essential Buildings and how to use those Buildings by playing the Tutorial.
Species Specific Buildings
Some Buildings will only appear in the Reputation Rewards Blueprint pool if certain Species are in the Settlement. These are:
Construction
To construct a building, you must first have that building's Blueprint. Then, you can see that Blueprint in the toolbar of icons at the bottom of the screen. Click to place the Blueprint on the map. If the building will have a working range, a green circle will indicate that range. Red squares under the construction site indicate obstacles such as trees, roads, or other buildings.
Once the construction site for your building is placed, you can select a priority and view which resources have or have not yet been delivered to the site. Before construction is completed, you can move the construction site of most buildings for free.
Builders
Buildings are constructed by Villagers that aren't assigned to work anywhere else. If you need a building built quickly, you will need to dismiss several workers from their workplaces. If no Builders are available, a hammer icon will appear above all buildings that are awaiting construction, letting you know that you need to dismiss a worker somewhere or the building materials will never be delivered and construction will never finish.
Construction Toolbar

The construction toolbar at the bottom of the screen, also showing the tooltip over the second icon for Camps, which looks like a mushroom and leaf. Hold your mouse over an icon to see the tooltip.
Buildings are constructed by selecting from the Blueprints in the construction toolbar. From left to right, the construction icons represent the following categories of Blueprints:
 Roads, which are not buildings per se, but built like them. They increase Villagers' speed walking across the map.
 Resource Gathering, which gather resources from resource nodes. You start most maps with the same 5 options: Woodcutters' Camp, Stonecutters' Camp, Harvesters' Camp, the Small Gathering Camps, Small Fishing Hut, Geyser Pump, Rain Collector, and Mine.
 Food Production, which farm resources from Fertile Soil and cook Complex Foods.
 Housing, which fulfills Villagers' Housing Needs.
 Industry Buildings, which produce Resources from other Resources with Recipes.
 City Buildings, which include Hearths, Warehouses, and the Trading Post. This category will also contain buildings that provide Services when you have earned their Blueprints.
 Decorations, which are used to upgrade Hearths.
Next to the construction toolbar are the buttons for marking trees (the axe icons). To the far right is the button for destroying buildings, roads, or deposits.
Range

Selecting the Ancient Hearth shows the range within which Housing must be placed to be functional.
Depending on the building you've chosen to build (or move), the game may reveal one or more special overlays, highlighting, or icons:
- the range of the Hearth may be shown when placing another Hearth, housing buildings, or Decorations
- the range of gathering when placing a camp or a farm
- highlighting of tiles that contain Fertile Soil when placing farms
- icons of nearby Resources on map tiles when placing gathering camps and mines
- highlighting of Trees that have been marked for cutting when placing a Woodcutters' Camp
Most industry buildings do not show ranges. (The Mine is the exception, showing Resource icons.) Instead of a range, when placing one of these buildings white lines will connect to nearby buildings where Resources could be retrieved for the Recipes in the building you are placing.
Moving a building

This camp is a moveable building.

After construction finishes, if a building may be moved the button to do so appears large, in blue, at the top left the Building Panel. Holding your mouse over the button will tell you whether the building may be moved for free, like a Woodcutters' Camp. Some buildings can be moved for a cost, like a Plantation for 1  Planks. Most buildings that produce goods using Recipes cannot be moved at all, and the icon will not appear on their building panel.
You can see before constructing a building whether it will be moveable. This appears on the same tooltip where you can preview the cost of the building before placing it for construction. In the screenshot to the right, notice the blue Move button on the building's picture in its construction tooltip.
For buildings that can be moved (especially for free), you can place the blueprint close to a warehouse for fast delivery of construction materials, then move it into a more appropriate place.
Building Panel

The Building panel for a Weaver.
The Building panel contains information on a Building you have selected or placed for construction on the map. The contents vary widely depending on what kind of Building it is, but there are some common elements.
The top-left corner contains any major interactions: moving the Building, if possible, and deactivating the Building to instantly remove any workers.
Leftmost on the panel are the worker slots. The main content of the panel is a few tabs with different information and interactive controls for the Building's functions. When you first open it, the first tab will show the Building's description, which would include a summary of its Recipes and any Specialization.
Workers

Example building panel showing 3 workers with 3 different statuses.
Most Buildings have space for two or more Villagers to work. On the Building panel, by clicking on slots, you can assign Villagers to work that Building or dismiss them to be builders for your settlement until they are reassigned.
Next to an assigned worker's icon another small icon will appear that indicates the status of the worker. They may be the following:
 = walking to the Building
 = actively producing or gathering
 = moving goods from the Building to a Warehouse or vice versa
 = walking to the Hearth for a break
 = resting at the Hearth
 = idling, unable to work
If the worker is unable to work, then their icon will be an exclamation point. This occurs when there are no more Resources to work with (whether from the nearby map tiles or from the Warehouse), if production limits have been reached, or if you must select one of the options of a Glade Event and press the Investigate button. The Building will also receive an exclamation point icon above it on the map view (even with the Building panel closed) to get your attention since an idling worker may be wasting valuable time, however you are free to ignore these icons.
Empty Worker Slots

If a Building has space for more workers, you click the black-and-white icon with a nondescript person and green plus sign to choose which Species to add from the radial menu.
There are noteworthy reasons to leave worker slots empty in Buildings. For example, emptying the Woodcutters' Camps of all of their workers just before the Storm can lower Hostility enough so you don't lose any Villagers during the Storm due to low Resolve. Another example is if your settlement is producing a good more quickly than it is needed, removing a worker will slow down the rate of production.
Specializations
Some Buildings have Specializations for some workers that make those individual Villagers more comfortable, granting them a bonus to their Resolve, or a bonus to production quantity or speed due to their proficiency.
Specializations are indicated with small, color-coded icons on the Building panel. You can hold your mouse over these icons to see a tooltip that identifies the name of the Specialization and its type. Additionally, a blue glowing aura indicates workers' comfort bonus; spinning wheel indicates their proficiency bonus.
Besides being helpful passive bonus for your settlement, using Specializations at key moments can save your settlement from losing Villagers due to low Resolve. For example, a Building like the Cookhouse with 4 worker slots and its Warmth Specialization can be used to boost the Resolve of four  Lizards!
First Tab: Recipes
See also: Recipes

On the Building Panel for Production Buildings, the first tab contains the Recipes that the Building can produce. For Buildings like Gathering Camps and Farms, there are no tabs on the panel. The Resources they can gather, the controls, and the Building's Internal Storage are shown together on the panel. Service Buildings also have Recipes on their first tab, and while they aren't the same kind of Recipes as Production Buildings that convert Resources into other Resources, they have similar controls.
In the list of Recipes, you can check or uncheck the Recipes you want the workers to produce. By default when a Building is constructed, all Recipes are enabled (can be adjusted in Game Options). You may want to uncheck to disable Recipes that are lower efficiency than in other Buildings. For example, you may want to disable the Recipe for Planks in the Crude Workstation (☆) if you have also built a Lumber Mill (★★★), so you get the most efficient use of Wood . However, if your are in need of more Planks and you can afford to spend the extra Wood, it may be worth it to keep the Planks Recipe checked in the Crude Workstation.
In the list of Recipes, you can also click the up and down arrows to increase or decrease the priority of a Recipe. This will reorder the list, so the highest priority Recipes are on top (this can be changed in the Game Options.) When a Recipe is prioritized in a Building, the workers will spend all of their time making that Recipe. Once they are unable to produce more, they will move on to the next-lower priority Recipe. This may happen when the settlement runs out of the ingredient Resources or when a production or storage reserve limit is reached.
On the right side of the Recipes list, you can set the production limit of the Recipe. When the settlement has that number of that product Resource between that Building's internal storage and the Warehouse, then the workers will not start producing more. Workers often start production at the same time, so keep this in mind when it's crucial to conserve input resources.
Second Tab: Storage

The Weaver's panel shows ingredients ready to be used and storage of goods the workers have produced.

Most buildings have internal storage, where (a) ingredient Resources are brought from the Warehouse for use in the Building's Recipes and (b) gathered or produced Goods are kept until a batch can be taken to the Warehouse. The latter has limits, and Buildings' internal capacities can be increased by Perks and Upgrades in the Smoldering City.
Produced Goods Storage
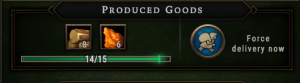
The Internal Storage in a Woodcutters' Camp is almost full. It has 8 Wood and 6 Copper Ore that need to be delivered to a Warehouse.
In the example screenshot, a Woodcutters' Camp has an internal Storage capacity of 15. It is holding 8 Wood and 6  Copper Ore that are awaiting delivery to the closest Warehouse. The blue button to Force delivery now can be used before the Storage is full to force a worker to stop producing and take Goods to the Warehouse. This is useful if you have Buildings awaiting construction or Glade Events that urgently need Resources.
Ingredients Storage

The ingredients stored in an unoccupied Crude Workstation are being wasted. They are inaccessible to other Buildings that could use them.
In another example, a Crude Workstation in a settlement still stands, but all its Recipes can be made with other, more efficient (higher-star) Buildings. However, this Building still has valuable ingredients stored that other Buildings cannot access. Clicking the red-and-white X button on the Resource icon instantly transfers these Goods back to the Warehouse. If you accidentally remove the wrong ingredient, a worker will need to go pick the ingredient back up from the Warehouse before they can work on the Recipe.
List of Essential Blueprints
Main page: List of Essential Blueprints
The Blueprints in this list can be earned through completing Deeds and buying Upgrades in the Smoldering City. Once earned, they become Essential, which means they are available from the start of every settlement.
Roads
| Blueprint |
Unlock or Upgrade
|
 Path Path |
(always available)
|
 Paved Road Paved Road |
Unlocked on Level 3
|
 Reinforced Road Reinforced Road |
Unlocked on Level 7
|
Camps
Food Production
 Farm Field Farm Field |
(always available)
|
 Field Kitchen Field Kitchen |
Unlocked with Obsidian Archive Level 11 Upgrade
|
Housing
Industry
City Buildings
List of Buildings
- Main page: List of Buildings
Starting Buildings
Every settlement starts with an Ancient Hearth and Main Warehouse.
Buildings every settlement starts with
| Building |
Purpose |
Workplaces |
Specialization
|
 Ancient Hearth Ancient Hearth
|
Heats nearby Houses. Villagers gather here to rest and eat.
|
1
|
 Warmth Warmth
|
 Main Warehouse Main Warehouse
|
Centralizes resources for settlement supply chain.
|
3
|
none
|
Resource Gathering
Resource Gathering buildings are starting points for your settlement to go out into the wild to gather Resources from the map. For Woodcutters' Camps, Gathering Camps, and Fishing Huts, the construction menu will highlight their range and show icons for the resource deposits or trees from which the Camp can gather. All Camps and Fishing Huts can be moved for free.
Some of the Camps have smaller and larger versions. If the Camp you have when you start a map is named "Small," then you can upgrade it by unlocking the Blueprint for the larger version. Small camps can only gather from small resource nodes; the regular camps can gather from both small and large resource nodes.
The Rain Collector and Advanced Rain Collector can be placed freely. It is recommended to place these buildings close to a Hearth since rainwater gathered in these building do not need to be transported to the warehouse. The Clay Pit, Geyser Pump, and Mine must be placed on fertile soil, a rainwater geyser, and ore deposit(s), respectively.
Food Production
Food production Buildings include Farms and Buildings whose primary purpose is Recipes for food. Many of these buildings also produce non-food items from farming or include non-food Recipes. This may give you more options or less in choosing your Blueprints, depending on how strict your needs are. Note: The Greenhouse can only be constructed on top of a 2x2 plot of Fertile Soil.
Housing
Housing Buildings must be constructed within range of a Hearth to work. These buildings satisfy villagers' need for shelter. Certain Housing Building also satisfy villagers' need for their species-specific housing. These have fewer places for residents and require that you unlock their Blueprints.
Industry Buildings
Industry Buildings produce intermediate crafting and building materials, trade goods, and the finished goods used for Services and other effects. Most of these buildings require you to unlock their Blueprints before you can place them. The four that you start with are listed first in the table.
City Buildings
City Buildings include buildings that provide Services and passive effects and the buildings that everyone starts out being able to access that provide essential settlement functions of Hearths, Warehouses, and Trade. Services Buildings can be quite expensive to build, costing upwards of several dozen building materials. The Blight Post and Forsaken Altar become available at different Difficulty levels: Veteran and Prestige 1, respectively.
Services Buildings
 Hooded Horse Wikis


