Trading
* Visit Trader_Wares to see a comprehensive list of traders and their wares.
Overview
* Visit Trader_Wares to see a comprehensive list of traders and their wares.
Trading is a way to exchange ![]() Amber for goods, and vice versa. You can do this through traders or Trade Routes.
Amber for goods, and vice versa. You can do this through traders or Trade Routes.
Traders
Traders will start arriving once you build the Trading Post. There are 2-8 (depending on your upgrades) regular traders that can arrive at your settlement every 720-529 seconds (depending on your upgrades). Traders will not arrive at your settlement during Storm. If their arrival timer reaches zero during Storm Season, they won't be able to enter until Drizzle. The first trader will arrive in 8:30 minutes, regardless of when you construct the Trading Post.
There are also 3 Glade Traders, who can sometimes be found in Small Glades on the map.
Building the Trading Post
You can find the Trading post in the  City Buildings tab. It requires 10
 ![]() Wood to build.
Wood to build.
Trading with traders
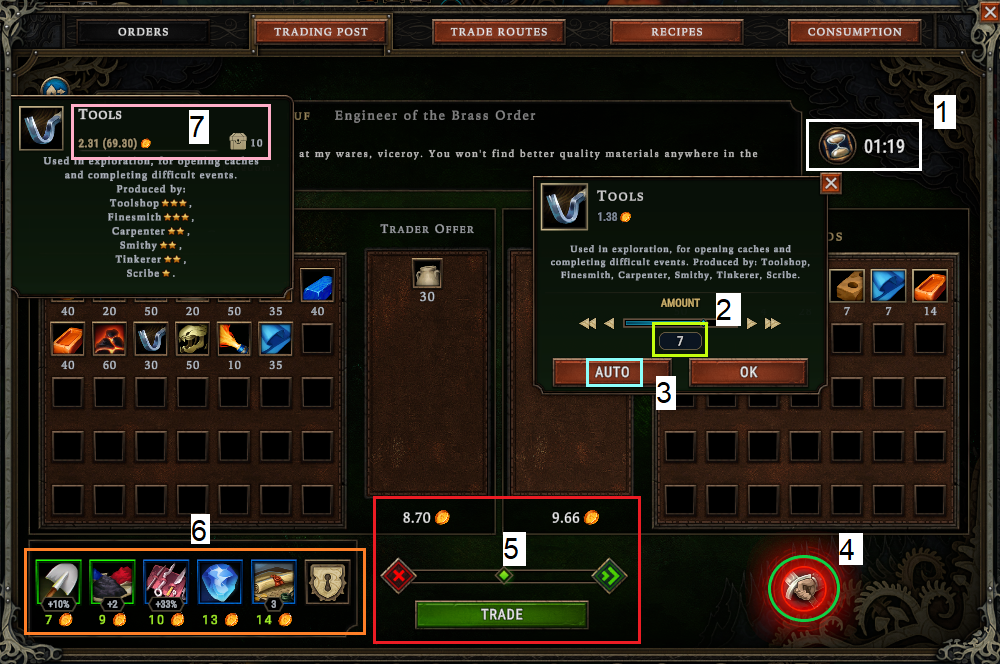
Once the trader has arrived, we can click on their icon or the Trading Post to be directed to the Trading Screen, as seen below:
- In WHITE, we see the amount of time the trader will stay in the settlement, available to trade.
- In NEON GREEN, we can type in the amount of goods we are trading. We can also click on the arrows to increase or decrease by 1.
- In NEON BLUE, we see the "Auto" function. Clicking this function will have the trader automatically calculate the amount of goods needed to make the trade acceptable to them.
- In GREEN on the bottom right, we see the "Assault the Trader" option. See Trader Wares for more information on what assaulting them gives you.
- In RED on the middle of the screen, we see visually by how fair the deal is to us or the trader, deals will only be accepted once the button is in the middle of the bar. If the button is too far right and the bar is green, you are getting ripped off.
- In ORANGE on the left, we see the Perks and Cornerstones the trader sells, and for how much.
- PINK we can see what 1 unit of a good is worth, how much the stack is worth in (brackets) and how many we have in our Warehouse by the
 . You need to HOVER over the image of the good to get this tooltip.
Assaulting the Trader
Assaulting the Trader has both positive and negative consequences. The specific numbers of exactly what you get is trader dependent, see Trader Wares for the numbers. Below is a more detailed description of the mechanic generally.
Positive: You will get:
- Some % of the stacks they have with them.
- Some % of the Perks and Blueprints they have with them.
For each type (resources, and perks / blueprints), the mechanic works like this: Multiply the percent for that trader by the number of stacks of items, and round up. You will get exactly that many stacks, but which stacks will be chosen randomly. The calculation is the same for the number of perks / blueprints.
Negative:
This is a list of all the types of negative consequences. Not all traders will give all negative types. Again, see Trader Wares for the specifics.
You can get:
- Usually:
- Villager deaths
- Impatience
- Permanent loss of Trader Arrival Speed
- Permanent loss of City Score
- Rarely:
- Permanent loss of cost of goods sold to traders (Sothur the Ancient only)
- Permanent Hostility (glade traders only)
Trade Routes
Trade routes are a way for you to trade your goods for ![]() Amber when the trader is not at the Settlement. As you build up the relationship (Standing), you will get more
Amber when the trader is not at the Settlement. As you build up the relationship (Standing), you will get more ![]() Amber for your goods. This is the most profitable way to earn
Amber for your goods. This is the most profitable way to earn ![]() Amber for your goods
Amber for your goods
You need ![]() Pack of Provisions to trade via Trade routes. Trade Routes will refresh with every Season change.
Pack of Provisions to trade via Trade routes. Trade Routes will refresh with every Season change.
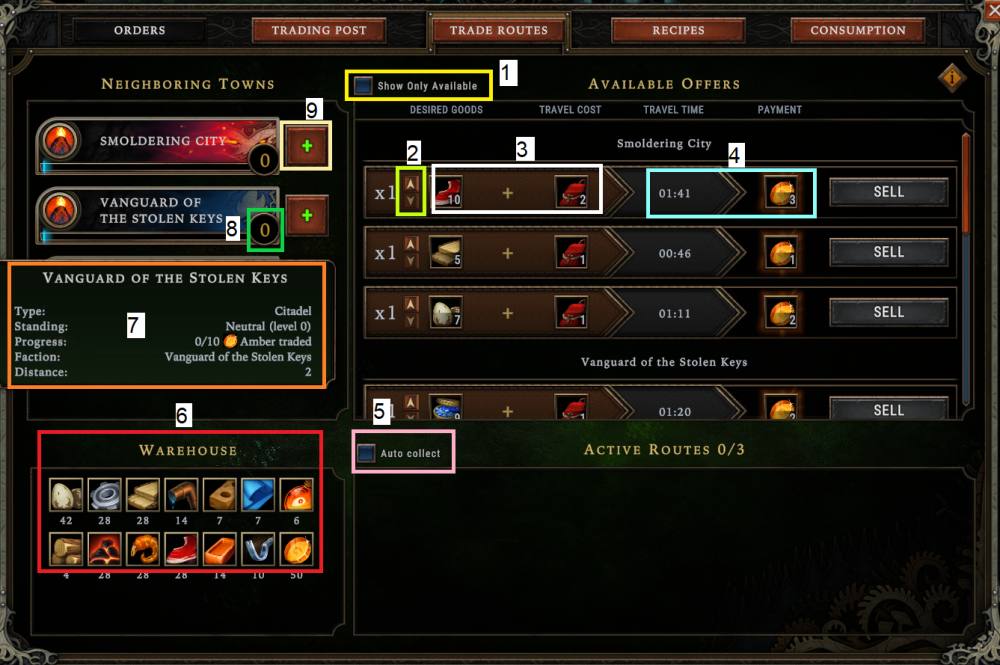
- In YELLOW, is the option to show all Trade Routes, or only Trade Routes you're currently able to fulfill.
- In NEON GREEN, we see buttons to increase or decrease the amount of goods we're willing to Trade.
- In WHITE, we see the total goods and
 Pack of Provisions we are trading. If you don't have enough Goods or
  Pack of Provisions for a trade route, they are going to be highlighted in red.
 - In NEON BLUE, we see the amount of time until we get paid for this Trade Route, as well the amount of
 Amber we are receiving for it.
 - In PINK, we see the option to collect the
 Amber from a completed Trade Route as soon as it completes, or to wait until we manually complete it. Please see the Strategy section on why you would use this option.
 - In RED, we see which goods we currently have in our Warehouses
- In ORANGE, we see our current Standing Status with a settlement. Read more about this by clicking on Standing Status.
- In GREEN, we see our current Standing with another Settlement / Faction.
- In BEIGE, we see the option to buy another Trade Route Option Slot from a specific Faction / Settlement.
Standing with other settlements / Factions
Standing (or relationship) with other Factions / Settlements influence how much your goods are worth to them. The higher your Standing with other Settlements / Factions, the more ![]() Amber they are willing to pay on average, and the more goods you will be able to trade with them.
Amber they are willing to pay on average, and the more goods you will be able to trade with them.
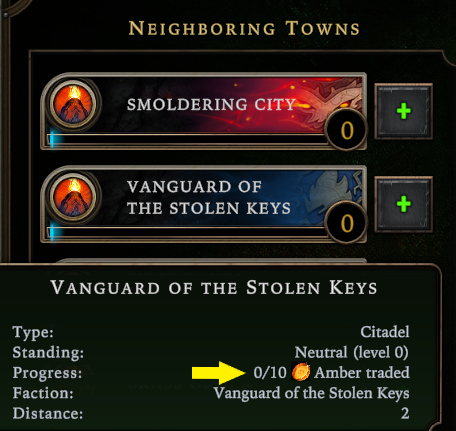
You gain Standing by initiating Trade Routes with Settlements / Factions. How much ![]() Amber until your Standing improves, can be viewed by hovering over the name of the Faction / Settlement in the Trade Routes Screen and looking at the section indicated by the YELLOW arrow.
Amber until your Standing improves, can be viewed by hovering over the name of the Faction / Settlement in the Trade Routes Screen and looking at the section indicated by the YELLOW arrow.
For some examples of the effect Standing has on Trade Routes, see the following sheet.
Tradable Goods with other settlements / Factions
Factions and Settlements have a set list of goods they want to trade with your settlement. Below is a sortable table of possible goods requested by previous settlements:
Perks and Cornerstones affecting trade
| Name | Rarity | Description | Sources | Price | ||||
|---|---|---|---|---|---|---|---|---|
| Alt | Cor | Ord | Rel | Tra | ||||
| Epic | This time, it's the guild who’s going to pay you, not the other way around. Gain 10 |
x | Cor | x | x | x | 0 | |
 Beneficial Agreement Beneficial Agreement |
Uncommon | Traders will arrive 15% quicker. | x | x | Ord | Rel | Tra | 14 |
 Counterfeit Amber Counterfeit Amber |
Legendary | Apparently, there is a technique for extracting crystals similar to Amber from rainwater. Gain 10 |
x | Cor | x | x | x | 0 |
| Epic | Receive 10 |
x | Cor | Ord | x | x | 0 | |
 Deserted Caravans Deserted Caravans |
Legendary | Global production speed is 33% faster, but traders will arrive 50% slower. | x | Cor | x | x | x | 0 |
 Economic Migration Economic Migration |
Legendary | Rumor has it that your settlement is one of the wealthiest in the realm. Newcomers will arrive 15% quicker and bring 10% more goods for every 1 level of standing you have with other settlements on trade routes. (the bonus is added retroactively) | x | Cor | x | x | x | 0 |
 Export Contract (Stormforged) Export Contract (Stormforged) |
Mythic | Increases the production yield of packs of goods by +100%. Gain 2 additional active trade route slots. | Alt | x | x | x | x | 0 |
 Firekeeper Letters Firekeeper Letters |
Epic | The exchange of knowledge between firekeepers can be very beneficial. The maximum number of sacrifice stacks in the Ancient Hearth is increased by +1 for every 2 ongoing trade routes. | x | x | x | x | Tra | 30 |
 Free Samples Free Samples |
Legendary | Gain 1 |
x | Cor | x | x | x | 0 |
 Frequent Caravans Frequent Caravans |
Legendary | The Crown is very forgiving - as long as the goods keep flowing. Impatience grows 30% slower for 180 seconds every time you finish a trade route. | x | Cor | x | x | x | 0 |
 Friendly Relations Friendly Relations |
Epic | Boosts Global Resolve by 1 for every 3 levels of standing with other settlements in trade routes. (the bonus is added retroactively) | x | Cor | x | x | x | 0 |
 Guild Catalogue Guild Catalogue |
Epic | Traders will have 1 more perk or blueprint for sale. | x | Cor | x | x | x | 0 |
 Market Shift Plan Market Shift Plan |
Legendary | Big strategic changes always come with an adjustment period. Every neighboring town offers +2 more trade routes, but no trader will arrive in your settlement until you complete at least 3 trade routes. Traders currently staying in the settlement will leave immediately. | x | Cor | x | x | x | 0 |
 Prosperous Settlement Prosperous Settlement |
Legendary | Gain +1 to Global Resolve every time you sell goods worth 50 |
x | Cor | x | x | x | 0 |
| Legendary | The forest recedes, as heavily guarded trade caravans pour into the settlement. Hostility is reduced by 15 points every time you sell goods worth 30 Amber, but Complex Food needs grant 1 less Resolve Point. | x | Cor | x | x | x | 0 | |
 Royal Guard Training Royal Guard Training |
Legendary | The Crown sends two Royal Guards to your village. Instead of simply brawling, villagers will now train under them. Fulfilling the need for brawling grants an additional +5 to Resolve, but attacking a trader will result in you getting 2 extra Impatience Points. | x | Cor | x | x | x | 0 |
 Stormwalker Training Stormwalker Training |
Epic | Your villagers learn how to travel the wilderness from the very best - the Royal Stormwalkers. All trade routes are faster by 40%. | x | Cor | Ord | x | x | 0 |
 Stormwalker Training (Stormforged) Stormwalker Training (Stormforged) |
Mythic | Your villagers learn how to travel the wilderness from the very best - the Royal Stormwalkers. Trade route caravans travel faster by 40%. Traders will arrive 33% quicker. | Alt | x | x | x | x | 0 |
 Tightened Belt Tightened Belt |
Epic | Travel cost on trade routes is reduced by 1. Doesn't apply to routes already in progress. This effect scales along with the quantity of goods exported. | x | Cor | x | x | x | 0 |
 Tightened Belt (Stormforged) Tightened Belt (Stormforged) |
Mythic | Travel cost on trade routes is reduced by 3. Doesn't apply to routes already in progress. This effect scales along with the quantity of goods exported. | Alt | x | x | x | x | 0 |
 Trade Contract Trade Contract |
Rare | Traders will arrive 25% quicker. | x | x | Ord | Rel | Tra | 18 |
| Legendary | The settlement is known for being a major trade hub in the region. Gain 1 Reputation Point every time you sell goods worth 60 Amber, but fulfilling Orders awards 50% less Reputation. | x | Cor | x | x | x | 0 | |
 Trade Logs Trade Logs |
Epic | Detailed notes on different traders and their wares. Gain 1 additional active trade route slot. Traders will arrive 25% quicker. | x | Cor | Ord | x | Tra | 28 |
 Trade Logs (Stormforged) Trade Logs (Stormforged) |
Mythic | Detailed notes on different traders and their wares. Gain 2 additional active trade route slots. Traders will arrive +33% quicker and have +1 more cornerstones on sale. | Alt | x | x | x | x | 0 |
 Trade Negotiations Trade Negotiations |
Epic | Trade routes are worth 1 more |
x | Cor | x | x | x | 0 |
 Trade Negotiations (Stormforged) Trade Negotiations (Stormforged) |
Mythic | Trade routes are worth 3 more |
Alt | x | x | x | x | 0 |
 Urban Planning Urban Planning |
Legendary | For every 10 completed trade routes, all houses will have room for one more person. | x | Cor | x | x | x | 0 |
| Epic | Specializing in a particular branch of commerce can bring a lot of profit. |
x | Cor | Ord | Rel | x | 0 | |
City Score
As your settlement expands and you place down buildings, your city score will increase. The higher your city score, the higher the chance for a high-level trader to visit your settlement. Negative City Score prevents any traders from visiting.
As a general rule of thumb[1] for city attractiveness score:
- 0 points: Roads, Decorations and Rain collectors
- 1 point: Camps and Hydrant
- 2 points: Basic housing, farms(exclude small farm), and basic production
- 3 points: Small Farm, Luxury housing, and trading post
- 5 points: Most other buildings
- 8 points: Service buildings
- 10 points: Small Hearth, Forsaken Altar, and Rare glade ruins (e.g. Homestead)
Refer to the sheet for the score of each building.[2]
Attacking most traders permanently reduces your city score. To see by how much, please visit Trader Wares.
Strategy
- When the Flooded Roads Forest Mystery is active, pause the game, Sacrifice
 Wood,
Wood,  Algae, or
  Coal until it is no longer active, initiate trade routes, and then stop Sacrificing. This allows you to bypass the
  Pack of Provisions cost increase, if Hostility is low enough.[3]
 - It is a good idea to always install Rain Engines in the Makeshift Post in order to increase chances of double yields of
 Pack of Provisions.[4]
 - When Viceroys receive the Finders Keepers Forest Mystery, it is vital to turn off the "Auto Collect" option on Trade Routes, so Viceroys can "collect" routes in Drizzle, when they gain the extra goods.
- Assaulting traders is a very effective way to kill Villagers, gain Impatience and reduce Hostility.
- Taking cheap
 Meat or
  Eggs as an Embarkation Bonus and then turning them into
  Pack of Provisions is an easy way of starting Trade Routes early, if the
  Pack of Provisions Embarkation Bonus is too expensive.
Trivia
- Effects that increase traders' arrival rate are capped at +900% and cannot reduce the time between traders below ~71 seconds.[5]
- Perks that give Bonuses for trading Amber Value do not take Amber spent on Perks, Blueprints and Cornerstones into account.
References
- City Score was initially tested by Discord user Jhazrun.
- The sheet was provided by Discord user x4.
- Flooded Roads strategy by user codewarrior0.
- Rainpunk in Makeshift Post by user WaxBeast123.
- Minimal trader arrival time was tested by Discord user Cron.
 Hooded Horse Wikis


