World Map
This article was last updated during version 1.4.17. The game is now in 1.6.2. Some information may be out of date. Help us keep the wiki up to date by comparing this article against the patch notes and updating it.
Contents
Overview
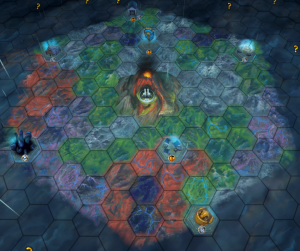
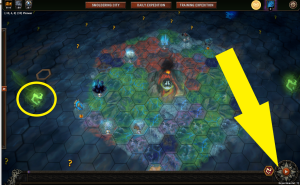
The World Map is where Viceroys plan their missions out from the Smoldering City to build settlements and make their way toward Seals. Choosing where on the map to go for the next mission and Embarking, including selecting caravans and difficulty, are done from the World Map.
Smoldering City
The Smoldering City is at the center of the world map and is where all Viceroys start. This is where Viceroys can buy Upgrades, check their game history and visit their Home, once unlocked.
Fog and visibility
The foggy cloud cover represents the unexplored world around the Smoldering City. The fog hides map tiles and their Biomes, World Events, and Map Modifiers until they are revealed by embarking and completing a mission nearby. Once a Viceroy gets close enough to an unexplored tile with a question mark icon, "?", the fog will be revealed until the next cycle.
Viceroys can use the Caravan Wagons Rewards on the when receiving a Royal Resupply to increase their visibility range on the world map.
Map tiles and biomes
The world map has 6 biomes, plus 2 DLC exclusive biomes. See their articles for more details.
- The
 Ashen Thicket
 - The
 Coastal Grove
 - The
 Coral Forest
 - The
 Cursed Royal Woodlands
 - The
 Marshlands
 - The
 Royal Woodlands
 - The
 Scarlet Orchard
 - The
 Sealed Forest
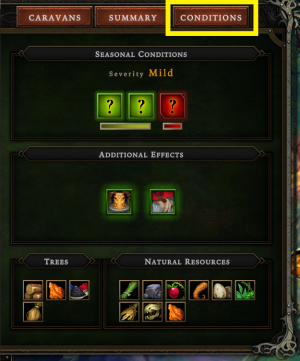
Each biome has a different assortment of Resources and unique mechanics. Some are simple, like double yields from cutting trees, or more complex like archaeology events.
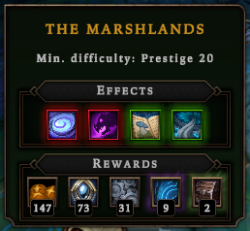
You can read more about each biome on the Conditions and Summary tabs after clicking on a map tile, as seen on the image on the right.
Reward indicators
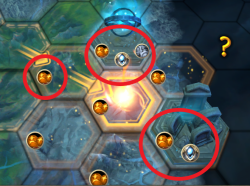
The rewards for completing a mission are determined by a number of factors, including biome and difficulty. These rewards are used in Upgrades within the Citadel and to pay for Stormforged Cornerstones.
On the left, the Summary screen shows exactly how many of each resource you would earn from a successful mission.
On the right, the world map shows what types will be rewarded on completion. These indicators can help you find the resources you need and to help you plan your route.
Embarkation Costs
The cost of Embarkation Bonuses will change with every caravan, this is to encourage players to try out different starting patterns. They are as follows:
| Bonus | Cost |
|---|---|
| 3 - 5 | |
| 4 - 6 | |
| 2 - 4 | |
| 3 - 5 | |
| 3 |
1 - 2 |
| 5 - 7 | |
| 1 | |
| 1 - 2 | |
| 3 - 4 | |
| 2 - 3 | |
| 2 | |
| 2 | |
| 2 |
For more information surroundinig embarkation, please see Embarking
World events
- Main article: World Events
World events are opportunities for Viceroys to earn extra rewards by completing a challenge or otherwise engaging a special opportunity. When a world event is within your visibility range, click on it to find out what it is.
| Event | Option 1 Requirement |
Option 1 Rewards |
Option 2 Requirements |
Option 2 Rewards |
|---|---|---|---|---|
 Bankrupt Trader |
Win with 150 |
Gain 1 Villager |
Win Before Year 8 ends, with 250 |
Gain 3 Villagers |
 Brass Order Engineer |
Pay 10 |
Gain 25 |
Win before year 9 ends with 3 Hearths upgraded to District Level (3) | Gain 15 |
 Cloaked Wanderer |
Lose 2 |
Gain 5 |
Become cursed for 2 games (8 Villagers die at the start of Year 8) |
Gain 10 |
 Commenda Contract |
Win a game before Year 8 ends, with 150 |
Gain 10 |
- | - |
 Crashed Airship |
Win before Year 8 ends, with 300 |
Gain 20 |
Lose 3 |
Traders arrive 25% Faster and their Perks and Blueprints costs 25% less for the next game |
 Wandering Eremite |
Lose 5 years | Blueprint rerolls cost 10 less |
Pay 25 |
Gain 5 |
 Fire Moths |
Lose 1 Villager | Gain 6 |
Gain 3 |
Gain Hostility For every 90 seconds of Sacrificing, a Villager dies. Sacrificing multiple fuels at the same time will make the timer go faster. Effects last until 1 successful game in the current Cycle. |
 First Dawn Company Caravan |
Lose 20 |
Gain 2 Villagers | Lose 35 |
Gain 30 |
 Followers of the Forsaken Gods |
Lose 2 Villagers | Gain 4 |
Win before Year 8 ends with 10 dead Villagers | Gain 25 5 Reserve Embarkation Points |
 The Gambler |
Lose 20 Win with 40% Increased Impatience Speed |
Gain 50 |
Lose 5 Win with 65% Increased Impatience Speed |
Gain 15 |
 Hanged Viceroy |
Win with nobody leaving. They can still die. |
Gain 2 Villager | - | - |
 Obsidian Loremaster |
Win after completing 2 Forbidden Glade Events | Gain 20 10 |
- | - |
 Shelled Mosquito Nest |
Lose 20 |
Gain 5 |
Win with NO Orders and 50% slower Trader arrival speed. | Gain 4 Reserve Embarkation Points and 40 |
 Roaming Fishmen Tribe |
Lose 30 |
Gain 15 |
Lose 30 |
Gain 15 |
 Sadarth the Wise |
Lose 10 |
A chosen World Map Modifier will appear | Lose 10 |
Gain 40 |
 Somber Procession |
Open no more than 1 Dangerous Glade | Gain 10 |
Lose 3 Reserve Embarkation Points | Villagers with species specific housing needs fulfilled gain +2 Resolve (Active for 3 games) |
 Storm Ant Column |
Start the game without any food. | Gain 20 |
- | - |
 Stormbird Egg |
Gain 30 |
-2 Resolve during the storm for 2 games | Lose 5 |
+15% Global Production Speed |
World modifiers
World modifiers add effects or conditions to any settlements built next to the tile the modifier is on. You cannot settle directly on these tiles. Some of these effects are beneficial and make your mission easier, and others add challenging constraints or significant limitations on your settlement.
List of positive world modifiers
| World modifier | Rewards | Description |
|---|---|---|
 Abandoned Settlement Abandoned Settlement
|
Another Viceroy tried to settle this area, but unfortunately failed... You start with a small destroyed settlement in your initial glade. | |
 Fertile Grounds Fertile Grounds
|
Glades have an increased chance of including Fertile Soil. | |
 Forsaken Gods Temple Forsaken Gods Temple
|
The Forsaken Gods' blessings can be ambiguous. You have a higher chance of receiving timed Orders from the Crown. | |
 Levitating Monument Levitating Monument
|
The power of a nearby monument makes everything feel lighter. You can move most buildings in your settlement. | |
 Overgrown Library Overgrown Library
|
A remnant of a bygone era, when royal archivists themselves ventured out into the wilderness in search of knowledge. One of your starting Blueprint choices is replaced by a Wildcard (you can choose one blueprint from all unlocked blueprints). | |
 Petrified Necropolis Petrified Necropolis
|
Rocks in this region have a very peculiar shape. And they smell funny... Gain | |
 Royal Outpost Royal Outpost
|
The proximity of a Royal Outpost makes it easier to communicate with the crown. The pool of Order choices will increase by 1. | |
 Ruined Armory Ruined Armory
|
An old abandoned armory, left behind after the Great Civil War. No villagers will die when attacking a Trader. | |
 Ruins Ruins
|
This region was settled very frequently in the past. The chance of finding Ruins in glades is much higher. | |
 Watchtower Watchtower
|
The Royal Guard is watching over this region. Discovering glades doesn't increase Hostility |
List of negative world modifiers
| World modifier | Rewards | Description |
|---|---|---|
 Ancient Battleground Ancient Battleground
|
This land was once the place of a mythical battle. You start with Hostility points. | |
 Bandit Camp Bandit Camp
|
Traders are afraid, and will not visit this area. Neither Trading nor Trade Routes are available. | |
 Barren Lands Barren Lands
|
The soil is too acidic. There is no Fertile Soil anywhere in this region. | |
 Corrosive Torrent Corrosive Torrent
|
The rain is especially toxic in this region. No Resources will be refunded after destroying a building. | |
 Dangerous Lands Dangerous Lands
|
Only Dangerous Glades can be found in this region. | |
 Fishmen Ritual Site Fishmen Ritual Site
|
A holy site for the Fishmen. No envoy dares to pass through here. Orders are disabled. | |
 Flooded Mines Flooded Mines
|
This region was heavily exploited by other viceroys. Hostility doesn't grow with each passing year, but you’ll gain 2 more Hostility Points per villager. | |
 Forbidden Lands Forbidden Lands
|
Only Forbidden Glades can be found in this region. | |
 Frosts Frosts
|
A bizarre cold rises from below and engulfs the Sacred Flame. Reduces the radius of Hearths. | |
 Gathering Storm Gathering Storm
|
A mysterious force is drawing in heavy clouds. Every year, the storm lasts longer. | |
 Haunted Forest Haunted Forest
|
Sometimes, viceroys condemn their people to a terrible fate... Dangerous and Forbidden Glade warnings are disabled. | |
 Land of Greed Land of Greed
|
The strange totem causes you to only focus on your wealth... And the Crown is worried. Impatience grows quicker, but every ongoing Trade Route reduces the Impatience generation speed. | |
 Monastery of the Holy Flame Monastery of the Holy Flame
|
The Monks of the Holy Flame are a fanatically egalitarian order. You cannot forbid consumption, or favor any species. | |
 Ominous Presence Ominous Presence
|
Something strange is trapped beneath the ground. Gain twice the Hostility each year, but every time a Villager dies or leaves, Hostility decreases. | |
 Shattered Obelisk Shattered Obelisk
|
You are unable to use the pause function. | |
 Sparkdew Crystals Sparkdew Crystals
|
The crown warned you not to settle near giant Sparkdew Crystals. Start with extra Impatience. | |
 Statue of the Forefathers Statue of the Forefathers
|
A crumbling statue depicting an unknown species. You can choose from fewer Cornerstones. | |
 Untamed Wilds Untamed Wilds
|
Nobody has settled in this region for multiple cycles. Every Dangerous and Forbidden Glade contains two threats instead of one (except glades with Archaeological Discoveries in the Scarlet Orchard). |
Seals
- Main article: Seals
On the world map, Seals are the endgame objectives for every Cycle. Viceroys work towards a Seal, enter the Sealed Forest, and successfully reforge a Seal to win the Cycle. The higher tier a Seal is, the further away it will spawn on the map. Seals and their tiers can be viewed on the Sealed Forest page.
On the left, after the last mission of the Cycle is over, clicking on End Cycle in the bottom right of the screen is the last action to take before starting over again from the Smoldering City.
On the right, a summary shows the Viceroy's accomplishments for that Cycle. Viceroys can choose which Seals can spawn on the map during the next Cycle.
 Hooded Horse Wikis