World Map: Difference between revisions
From Against the Storm Official Wiki
(Editing pass, including spoiler warning on world events) |
|||
| Line 1: | Line 1: | ||
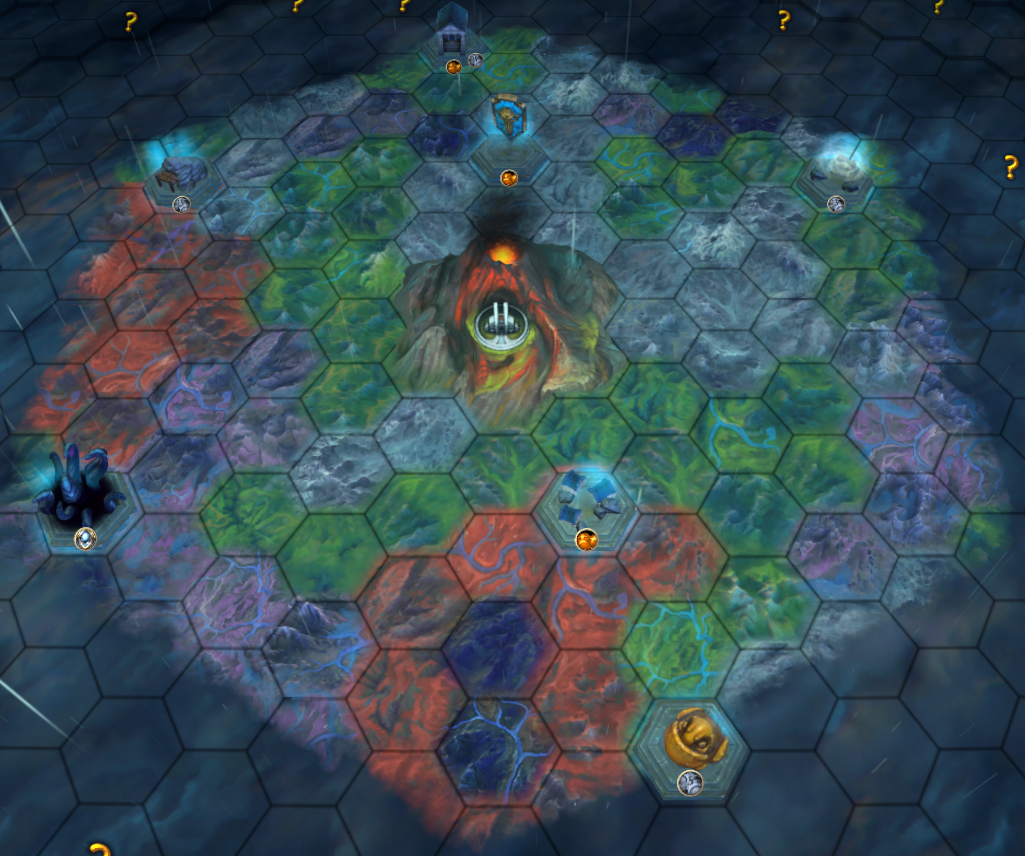
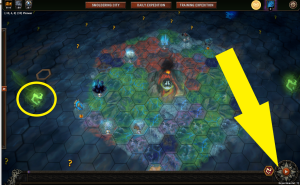
[[File:Biomes.png| | [[File:Biomes.png|left|80%|alt=Screenshot of the world map]] | ||
<div style="clear: both" aria-hidden="true" /> | |||
= Overview = | == Overview == | ||
The world map is where Viceroys plan their missions out from the [[Smoldering City]] to build settlements and make their way toward [[Seals]]. | |||
= | == Smoldering City == | ||
[[File:SmolderingCityMap.png|thumb|200px|Smoldering City on the Map]] | |||
[[File: | |||
The Smoldering City is at the center of the world map and is where all Viceroys start. This is where Viceroys can buy [[Upgrades]], check their game history and visit their [[Home]], once unlocked. | |||
<div style="clear: both" aria-hidden="true" /> | |||
< | |||
= | == Fog and visibility == | ||
[[File: | [[File:FogofWar.png|thumb|300px|The Fog of War]] | ||
The foggy cloud cover represents the unexplored world around the [[Smoldering City]]. The fog hides map tiles and their [[Biomes]], [[World Events]], and [[Map Modifiers]] until they are revealed by embarking and completing a mission nearby. Once a Viceroy gets close enough to an unexplored tile with a question mark icon, "?", the fog will be revealed until the next cycle. | |||
[[ | |||
Viceorys can use the [[Caravan Wagons]] Rewards on the when receiving a [[Royal Resupply]] to increase their visibility range on the world map. | |||
</ | |||
<div style="clear: both" aria-hidden="true" /> | |||
== Map tiles and biomes == | |||
|- | |||
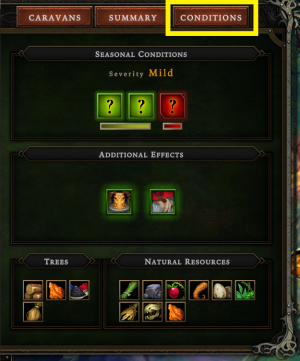
| {{Perk|Gray|File:WorldEventGeneric.png}} | [[File:BiomeConditionsTab.png|thumb|300px|Biome Conditions]] | ||
|- | The world map has 6 biomes. See their articles for more details. | ||
| {{Perk|Gray|File:WorldEventGeneric.png}} | * The [[File:CoralForestHex.png|{{ImgM}}]] [[Coral Forest]] | ||
* The [[File:CursedRoyalWoodlandsHex.png|{{ImgM}}]] [[Cursed Royal Woodlands]] | |||
|- | * The [[File:MarshlandsHex.png|{{ImgM}}]] [[Marshlands]] | ||
| {{Perk|Gray|File:Cloaked Wanderer.png}} | * The [[File:RoyalWoodlandsHex.png|{{ImgM}}]] [[Royal Woodlands]] | ||
* The [[File:ScarletOrchardHex.png|{{ImgM}}]] [[Scarlet Orchard]] | |||
|- | * The [[File:SealedForestHex.png|{{ImgM}}]] [[Sealed Forest]] | ||
| {{Perk|Gray|File:Commenda Contract.png}} | |||
Each biome has a different assortment of [[Resources]] and unique mechanics. Some are simple, like double yields from cutting trees, or more complex like archaeology events. | |||
|- | |||
| {{Perk|Gray|File:WorldEventGeneric.png}} | You can read more about each biome on the ''Conditions'' and ''Summary'' tabs after clicking on a map tile, as seen on the image on the right. | ||
|- | <div style="clear: both" aria-hidden="true" /> | ||
| {{Perk|Gray|File:Wandering Eremite.png}} | |||
=== Reward indicators === | |||
|- | |||
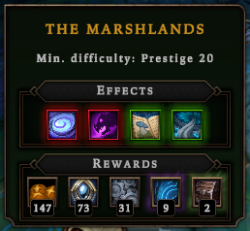
| {{Perk|Gray|File:WorldEventGeneric.png}} | [[File:TotalRewards.png|thumb|left|250px|Total Tile Rewards]] | ||
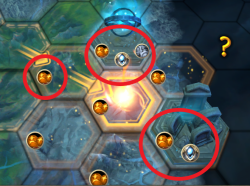
[[File:TileRewards.png|thumb|right|250px|Tile Rewards]] | |||
|- | |||
| {{Perk|Gray|File:First Dawn Company Caravan.png}} | The rewards for completing a mission are determined by a number of factors, including biome and difficulty. These rewards are used in [[Upgrades]] within the [[Citadel]] and to pay for [[Stormforged Cornerstones]]. | ||
|- | <div style="clear: both" aria-hidden="true" /> | ||
| {{Perk|Gray|File:Followers of the Forsaken Gods.png}} | |||
On the left, the ''Summary'' screen shows exactly how many of each resource you would earn from a successful mission. | |||
|- | |||
| {{Perk|Gray|File:Event Gambler.png}} | On the right, the world map shows what types will be rewarded on completion. These indicators can help you find the resources you need and to help you plan your route. | ||
|- | {| | ||
| {{Perk|Gray|File:Hanged Viceroy.png}} | | {{rl|Food Stockpiles|large}} | ||
|- | |||
|- | | {{rl|Machinery|large}} | ||
| {{Perk|Gray|File:Obsidian Loremaster.png}} | |- | ||
| {{rl|Artifacts|large}} | |||
|- | |} | ||
| {{Perk|Gray|File:WorldEventGeneric.png}} | |||
=== World events === | |||
|- | |||
| {{Perk|Gray|File:Roaming Fishmen Tribe.png}} | :''Main article: [[World Events]]'' | ||
|- | [[File:WorldEventTiles.png|thumb|300px|World Events on the Map]] | ||
| {{Perk|Gray|File:WorldEventGeneric.png}} | |||
World events are opportunities for Viceroys to earn extra rewards by completing a challenge or otherwise engaging a special opportunity. When a world event is within your visibility range, click on it to find out what it is. | |||
|- | |||
| {{Perk|Gray|File:WorldEventGeneric.png}} | <div style="clear: both" aria-hidden="true" /> | ||
|- | {| class="wikitable sortable mw-collapsible mw-collapsed" | ||
| {{Perk|Gray|File:StormbirdEggWorldEvent.png}} | |+ SPOILER WARNING! List of world events | ||
! World event !! Description | |||
|- | |- | ||
| {{Perk|Gray|File:WorldEventGeneric.png}} | | {{Perk|Gray|File:WorldEventGeneric.png}} Bankrupt Trader | ||
| Wading through the forest, you encounter a peddler pulling a wagon. It looks like his luck has run out and he's desperate to bounce back. If you bring him enough amber, he is willing to lend you some of his best workers until the end of the cycle. | |||
|- | |||
| {{Perk|Gray|File:WorldEventGeneric.png}} Brass Order Engineers | |||
| The narrow and winding path through the forest suddenly opens up, and a huge clearing appears before you. In the distance, you can see a group of Beavers hammering away at what appears to be a wooden scaffolding. Their uniforms bear the mark of the Brass Order. | |||
|- | |||
| {{Perk|Gray|File:Cloaked Wanderer.png}} Cloaked Wanderer | |||
| "Always into the east" mumbles the wretched traveler, clutching something in his hand. Somehow you know that trying to take it by force would not be the wisest decision, but maybe he would be willing to part with it... for the right price. | |||
|- | |||
| {{Perk|Gray|File:Commenda Contract.png}} Commenda Contract | |||
| The guild has made you an offer. They've found an excellent spot for a trading hub and want you to establish it. In theory, only the Crown can command viceroys, but the guild has an unusual gift for finding clever ways around such antiquated laws. | |||
|- | |||
| {{Perk|Gray|File:WorldEventGeneric.png}} Crashed Airship | |||
| You encounter the wreckage of one of the Merchant Guild's famous airships. You can see a very busy crew running around it, trying to fix the ship and recover lost supplies. Suddenly, an old Beaver in a captain's blazer notices you, and yells out for help. | |||
|- | |||
| {{Perk|Gray|File:Wandering Eremite.png}} Wandering Eremite | |||
| Your caravan is suddenly stopped by an old Beaver in rugged clothing, blocking the passage. He seems to not have a care in the world, and won't move out of the way to let your wagons pass. His calm demeanor stands in stark contrast to the fast approaching storm clouds behind you. Perhaps you can learn from him? | |||
|- | |||
| {{Perk|Gray|File:WorldEventGeneric.png}}Fire Moths | |||
| Villagers in this settlement have succumbed to the Disease of the Flame. Folks call such people Fire Moths, as those who lost themselves to the fire now sit around the hearth, staring at it aimlessly. You look into the flames for a while yourself, but there is nothing you can do for those wretched souls. | |||
|- | |||
| {{Perk|Gray|File:First Dawn Company Caravan.png}} First Dawn Company Caravan | |||
| You come across a lively and bustling encampment of the First Dawn Company. One of the viceroys, sitting by the campfire, waves his hand in your direction, inviting you to join the group. Although it would be wiser not to trust the First Dawn, a moment's rest will surely do you good. | |||
|- | |||
| {{Perk|Gray|File:Followers of the Forsaken Gods.png}} Followers of the Forsaken Gods | |||
| As you make your way through the wilds, you hear a faint humming... An eerie song in a strange language. As you get closer, you see a circle of cloaked figures gathered around a strange obelisk. One of them points at you, and the others start slowly walking towards you. | |||
|- | |||
| {{Perk|Gray|File:Event Gambler.png}} The Gambler | |||
| You stumble upon a rugged man, wearing an old tattered cloak with the viceroys' insignia on it... and yet he has no caravan with him. He smiles at you, clearly relieved to see another living soul in this unforgiving wilderness. But he isn't asking you for food or clothing. Instead, he offers you a game of chance. | |||
|- | |||
| {{Perk|Gray|File:Hanged Viceroy.png}} Hanged Viceroy | |||
| People in these parts can take a lot, but whatever this poor bastard decided to do made the villagers snap. While some of them just sit in resignation, others are willing to push forward if you can prove to them that you actually care. | |||
|- | |||
| {{Perk|Gray|File:Obsidian Loremaster.png}} Obsidian Loremaster | |||
| This Royal Loremaster was clearly sent here to locate something important to the Crown. After a few hours of trying, you are convinced there is no power in this world that would pry any clue about his goal from him. He has connections though, and is willing to pay for your help. | |||
|- | |||
| {{Perk|Gray|File:WorldEventGeneric.png}} Shelled Mosquito Nest | |||
| Your scouts report a nearby nest of shelled mosquitos. You would rather step into the eye of the storm than come too close to their burrow, but shelled mosquitos form nests around old broken seals. Perhaps there is a way you can lure them away for a short while. | |||
|- | |||
| {{Perk|Gray|File:Roaming Fishmen Tribe.png}} Roaming Fishmen Tribe | |||
| You come across a bizarre sight - a group of 8 Fishmen wandering through the forest, led by an old soothsayer in a gray robe made of seaweed and shells. You feel inclined to run or take up a weapon, but the creatures don't seem hostile. One of them approaches you slowly, and in its black, fishy eyes, you can see a glimmer of curiosity mixed in with desperation. | |||
|- | |||
| {{Perk|Gray|File:WorldEventGeneric.png}} Sadarth the Wise | |||
| You meet a hooded figure on the side of the road. Their face is shrouded in darkness, but you recognize some familiar features. As the creature approaches you, the name of Sothur immediately jumps to mind... yet this isn't him. Another ancient one, perhaps? The man smiles gently, revealing a row of disturbingly sharp teeth. | |||
|- | |||
| {{Perk|Gray|File:WorldEventGeneric.png}} Somber Procession | |||
| Your caravan stumbles upon a long and somber procession, carrying a body encased in a block of amber. Another viceroy perished, attempting the trial to join the Queen's Hands. The mourners ask you not to disturb the forest, and ensure their safe passage back to the Citadel. | |||
|- | |||
| {{Perk|Gray|File:StormbirdEggWorldEvent.png}} Stormbird Egg | |||
| Cutting through the thicket, your caravan stumbles upon a stormbird egg. Your instincts scream to leave it in peace and flee before its mother comes back, but... who hasn't dreamed of having a pet stormbird, at least for a while? | |||
|- | |||
| {{Perk|Gray|File:WorldEventGeneric.png}} Storm Ant Column | |||
| An enormous column of Storm Ants stretches in both directions. Large as a Beaver's fist, they've made entire armies wait for days. On a large tree nearby, right in the middle of the ant column, you can see a trader with his guard, screaming for help. But only one thing in the world would make the Storm Ants change course. Food. | |||
|} | |} | ||
= World | |||
[[File:WorldModifierTiles.png|thumb| | === World modifiers === | ||
World | |||
< | [[File:WorldModifierTiles.png|thumb|300px|Map Modifiers outlined in Yellow]] | ||
=== | |||
{| class="wikitable mw-collapsible | World modifiers add effects or conditions to any settlements built next to the tile the modifier is on. You cannot settle directly on these tiles. Some of these effects are beneficial and make your mission easier, and others add challenging constraints or significant limitations on your settlement. | ||
|+ | |||
| | <div style="clear: both" aria-hidden="true" /> | ||
|- | |||
| {{Perk| | ==== List of positive world modifiers ==== | ||
|- | {| class="wikitable sortable mw-collapsible" | ||
| {{Perk| | |+ World modifiers that benefit settlements | ||
! World modifier !!class=unsortable| Description | |||
|- | |- | ||
| {{Perk| | | {{Perk|{{PerkGreen}}|File:AbandonedSettlement.png} Abandoned Settlement | ||
| Another Viceroy tried to settle this area, but unfortunately failed... You start with a small destroyed settlement in your initial glade. | |||
|- | |- | ||
| {{Perk| | | {{Perk|{{PerkGreen}}|File:FertileGrounds.png}} Fertile Grounds | ||
| Glades have an increased chance of including [[Fertile Soil]]. | |||
|- | |- | ||
| {{Perk| | | {{Perk|{{PerkGreen}}|File:ForsakenGodsTemple.png}} Forsaken Gods Temple | ||
| Due to a strange curse, villagers with low [[Resolve]] can't leave the settlement. None of your villagers will generate [[Reputation]] from Resolve. | |||
|- | |- | ||
| {{Perk| | | {{Perk|{{PerkGreen}}|File:LevitatingMonument.png}} Levitating Monument | ||
| The power of a nearby monument makes everything feel lighter. You can move most buildings in your settlement. | |||
|- | |- | ||
| {{Perk| | | {{Perk|{{PerkGreen}}|File:OverGrownLibrary.png}} Overgrown Library | ||
| A remnant of a bygone era, when royal archivists themselves ventured out into the wilderness in search of knowledge. One of your starting [[Blueprints|Blueprint choices]] is replaced by a Wildcard (you can choose one blueprint from all unlocked blueprints). | |||
|- | |- | ||
| {{Perk| | | {{Perk|{{PerkGreen}}|File:PetrifiedNecropolis.png}} Petrified Necropolis | ||
| Rocks in this region have a very peculiar shape. And they smell funny... Gain {{rl|Meat}} for every {{rl|Stone}} or {{rl|Clay}} gathered. | |||
|- | |- | ||
| {{Perk| | | {{Perk|{{PerkGreen}}|File:RoyalOutpost.png}} Royal Outpost | ||
| The proximity of a Royal Outpost makes it easier to communicate with the crown. The pool of [[Orders|Order choices]] will increase by 1. | |||
|- | |- | ||
| {{Perk| | | {{Perk|{{PerkGreen}}|File:RuinedArmory.png}} Ruined Armory | ||
| An old abandoned armory, left behind after the Great Civil War. No villagers will die when attacking a trader. | |||
|- | |||
| {{Perk|{{PerkGreen}}|File:RuinsModifier.png}} Ruins | |||
| This region was settled very frequently in the past. The chance of finding ruins in glades is much higher. | |||
|- | |||
| {{Perk|{{PerkGreen}}|File:WatchTower.png}} Watchtower | |||
| The Royal Guard is watching over this region. Discovering glades doesn't increase [[Hostility]] | |||
|} | |} | ||
=== | |||
{| class="wikitable mw-collapsible | ==== List of negative world modifiers ==== | ||
|+ | |||
| | {| class="wikitable sortable mw-collapsible" | ||
|- | |+ World modifiers that make missions harder | ||
| {{Perk|Red|File:AncientBattleground.png}} | ! World modifier !!class=unsortable| Description | ||
|- | |||
|- | | {{Perk|Red|File:AncientBattleground.png}} Ancient Battleground | ||
| {{Perk|Red|File:BanditCamp.png}} | | This land was once the place of a mythical battle. You start with [[Hostility]] points. | ||
|- | |||
|- | | {{Perk|Red|File:BanditCamp.png}} Bandit Camp | ||
| {{Perk|Red|File:BarrenLands.png}} | | Traders are afraid, and will not visit this area. Neither trading nor trade routes are available. | ||
|- | |||
|- | | {{Perk|Red|File:BarrenLands.png}} Barren Lands | ||
| {{Perk|Red|File:CorrosiveTorrent.png}} | | The soil is too acidic. There is no [[Fertile Soil]] anywhere in this region. | ||
|- | |||
|- | | {{Perk|Red|File:CorrosiveTorrent.png}} Corrosive Torrent | ||
| {{Perk|Red|File:DangerousLands.png}} | | The rain is especially toxic in this region. No resources will be refunded after destroying a building. | ||
|- | |||
|- | | {{Perk|Red|File:DangerousLands.png}} Dangerous Lands | ||
| {{Perk|Red|File:FishmenRitualSite.png}} | | Only Dangerous Glades can be found in this region. | ||
|- | |||
|- | | {{Perk|Red|File:FishmenRitualSite.png}} Fishmen Ritual Site | ||
| {{Perk|Red|File:FloodedMines.png}} | | A holy site for the Fishmen. No envoy dares to pass through here. [[Orders]] are disabled. | ||
|- | |||
|- | | {{Perk|Red|File:FloodedMines.png}} Flooded Mines | ||
| {{Perk|Red|File:ForbiddenLands.png}} | | This region was heavily exploited by other viceroys. [[Hostility]] doesn't grow with each passing year, but you’ll gain 2 more Hostility Points per villager. | ||
|- | |||
|- | | {{Perk|Red|File:ForbiddenLands.png}} Forbidden Lands | ||
| {{Perk|Red|File:Frosts.png}} | | Only Forbidden Glades can be found in this region. | ||
|- | |||
|- | | {{Perk|Red|File:Frosts.png}} Frosts | ||
| {{Perk|Red|File:GatheringStorm.png}} | | A bizarre cold rises from below and engulfs the Sacred Flame. Reduces the radius of [[Hearths]]. | ||
| | |- | ||
|- | | {{Perk|Red|File:GatheringStorm.png}} Gathering Storm | ||
| {{Perk|Red|File:HauntedForest.png}} | | A mysterious force is drawing in heavy clouds. Every year, the storm lasts longer. | ||
|- | |||
|- | | {{Perk|Red|File:HauntedForest.png}} Haunted Forest | ||
| {{Perk|Red|File:LandOfGreed.png}} | | Sometimes, viceroys condemn their people to a terrible fate... Dangerous and Forbidden Glade warnings are disabled. | ||
|- | |||
|- | | {{Perk|Red|File:LandOfGreed.png}} Land of Greed | ||
| {{Perk|Red|File:MonasteryoftheHolyFlame'.png}} | | The strange totem causes you to only focus on your wealth... And the Crown is worried. [[Impatience]] grows quicker, but every ongoing trade route reduces the Impatience generation speed. | ||
|- | |||
|- | | {{Perk|Red|File:MonasteryoftheHolyFlame'.png}} Monastery of the Holy Flame | ||
| {{Perk|Red|File: OminousPresence.png}} | | The Monks of the Holy Flame are a fanatically egalitarian order. You cannot forbid consumption, or favor any species. | ||
|- | |||
|- | | {{Perk|Red|File: OminousPresence.png}} Ominous Presence | ||
| {{Perk|Red|File:ShatteredObelisk.png}} | | Something strange is trapped beneath the ground. Gain twice the [[Hostility]] each year, but every time a villager dies or leaves, Hostility decreases. | ||
|- | |||
|- | | {{Perk|Red|File:ShatteredObelisk.png}} Shattered Obelisk | ||
| {{Perk|Red|File:SparkdewCrystals.png}} | | You are unable to use the pause function. | ||
|- | |||
|- | | {{Perk|Red|File:SparkdewCrystals.png}} Sparkdew Crystals | ||
| {{Perk|Red|File:StatueoftheForefathers.png}} | | The crown warned you not to settle near giant Sparkdew Crystals. Start with extra [[Impatience]]. | ||
|- | |||
|- | | {{Perk|Red|File:StatueoftheForefathers.png}} Statue of the Forefathers | ||
| {{Perk|Red|File:UntamedWilds.png}} | | A crumbling statue depicting an unknown species. You can choose from fewer [[Cornerstones]]. | ||
|- | |||
| {{Perk|Red|File:UntamedWilds.png}} Untamed Wilds | |||
| Nobody has settled in this region for multiple cycles. Every Dangerous and Forbidden Glade contains two threats instead of one (except glades with Archaeological Discoveries in the [[Scarlet Orchard]]). | |||
|} | |} | ||
=== Seals === | |||
:''Main article: [[Seals]]'' | |||
[[File:EndCycleButton.png|thumb|left|300px|The End Cycle Button, and a Seal]][[File:CycleSummary.png|thumb|right|300px|The Cycle Summary Screen]] | |||
<div style="clear: both" aria-hidden="true" /> | |||
On the world map, Seals are the endgame objectives for every [[Cycle]]. Viceroys work towards a Seal, enter the [[Sealed Forest]], and successfully reforge a Seal to win the Cycle. The higher tier a Seal is, the further away it will spawn on the map. Seals and their tiers can be viewed on the [[Sealed Forest]] page. | |||
On the left, after the last mission of the Cycle is over, clicking on ''End Cycle'' in the bottom right of the screen is the last action to take before starting over again from the [[Smoldering City]]. | |||
On the right | On the right, a summary shows the Viceroy's accomplishments for that Cycle. Viceroys can choose which Seals can spawn on the map during the next Cycle. | ||
 Hooded Horse Wikis