Buildings: Difference between revisions
(buffed →Storage) |
(Added a new top-level section on the Building panel and grouped some things under that. Moved Hearth and Roads to their own article. Added starting buildings list. Improved layout of Camps list.) |
||
| Line 34: | Line 34: | ||
Most [[Industry]] Buildings typically do not need to show any of these things. (The Mine is an exception). For example, when placing a [[Provisioner]], there are no overlays or icons shown. | Most [[Industry]] Buildings typically do not need to show any of these things. (The Mine is an exception). For example, when placing a [[Provisioner]], there are no overlays or icons shown. | ||
== Building Panel == | |||
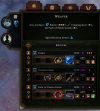
[[File:Building_panel_example-tab_1.png|thumb|100px|The Building panel for a Weaver.]] | |||
The Building panel contains information on a Building you have selected or placed for construction on the map. Counter-clockwise starting at the top of the panel, you can see four tabs, the [[Workers]], and the content of the tabs. The center-top of the panel, below the tabs, will show the Building's description, which typically includes a summary of its [[Recipes]] and any [[Specialization]]. | |||
=== Moving a Building === | === Moving a Building === | ||
[[File:Moveable_building_from_construction_toolbar.png|thumb| | [[File:Moveable_building_from_construction_toolbar.png|thumb|100px|This Camp is a moveable Building.]] | ||
[[File:Move_Icon.png|32px | [[File:Move_Icon.png|32px|Move button]] | ||
If a Building may be moved, the button to do so appears large, in blue, | If a Building may be moved, the button to do so appears large, in blue, at the top left the Building panel. Holding your mouse over the button will tell you whether the Building may be moved for free, like a [[Camps|Camp]]. Some Buildings can be moved for a cost, like a [[Shelter]] for 5 [[Wood]]. Most Buildings that produce goods using [[Recipes]] cannot be moved at all, and the icon will not appear on their Building panel. | ||
You can see before constructing a Building whether it will be moveable. This appears on the same tooltip where you can preview the cost of the Building before placing it for construction. In the screenshot to the right, notice the blue Move button on the Building's picture in its construction tooltip. | You can see before constructing a Building whether it will be moveable. This appears on the same tooltip where you can preview the cost of the Building before placing it for construction. In the screenshot to the right, notice the blue Move button on the Building's picture in its construction tooltip. | ||
=== Workers === | |||
[[File:Worker_panel_example.png|thumb|300px|Example building panel showing 3 Workers with 3 different statuses.]] | [[File:Worker_panel_example.png|thumb|300px|Example building panel showing 3 Workers with 3 different statuses.]] | ||
Most Buildings have space for two or more [[Villager]] to work. Selecting a Building open its panel on the right side of your game window. There, you can assign or dismiss Villagers as [[Workers]]. | Most Buildings have space for two or more [[Villager]] to work. Selecting a Building open its panel on the right side of your game window. There, you can assign or dismiss Villagers as [[Workers]]. | ||
Next to the Worker icon, like a [[Human]], a small icon will appear that indicates the status of the Worker. They may be the following: | Next to the Worker icon, like a [[Human]], a small icon will appear that indicates the status of the Worker. They may be the following: | ||
* walking to the Building | * [[File:Worker_transport_icon.png|x16px]] = walking to the Building | ||
* actively producing or gathering | * [[File:Worker_production_icon.png|x16px]] = actively producing or gathering | ||
* moving goods from the Building to a [[Warehouse]] or vice versa | * [[File:Worker_storage_icon.png|x16px]] = moving goods from the Building to a [[Warehouse]] or vice versa | ||
* resting at the Hearth | * [[File:Worker_rest_icon.png|x16px]] = resting at the Hearth | ||
* idling, unable to work | * [[File:Worker_idle_icon.png|x16px]] = idling, unable to work | ||
If the worker is unable to work, then their icon will be an exclamation point. This occurs when there are no more Resources to work with (whether from the nearby map tiles or from the Warehouse) or if you must select one of the options of a [[Glade Event]] and press the '''Investigate''' button. The Building will also receive an exclamation point icon above it on the map view (even with the Building panel closed) to get your attention since an idling Worker may be wasting valuable time, however you are free to ignore these icons. | If the worker is unable to work, then their icon will be an exclamation point. This occurs when there are no more Resources to work with (whether from the nearby map tiles or from the Warehouse) or if you must select one of the options of a [[Glade Event]] and press the '''Investigate''' button. The Building will also receive an exclamation point icon above it on the map view (even with the Building panel closed) to get your attention since an idling Worker may be wasting valuable time, however you are free to ignore these icons. | ||
=== Specializations === | ==== Empty Worker Slots ==== | ||
[[File:Worker_Circle_Widget.png|64px|link=]] | |||
If a Building has space for more Workers, you click the black-and-white icon with a nondescript person and green plus sign to choose which [[Species]] to add. | |||
There are noteworthy reasons to leave Worker slots empty in Buildings. For example, emptying the Woodcutters' Camps of all of their Workers just before the [[Storm]] can lower the [[Hostility]] of [[The Forest|the Forest]] enough so you don't lose any [[Villagers]] during the Storm due to low [[Resolve]]. Another example is if your settlement is producing a good more quickly than it is needed, removing a Worker will slow down the rate of production. | |||
==== Specializations ==== | |||
Some Buildings will indicate that there are Specializations available with small, color-coded icons. You can hold your mouse over these icons to see a tooltip that identifies the name of the Specialization. However, the name does not tell you which of the two types of Specializations it is. Specializations either grant bonus to [[Resolve]] or chance for double production. A Building like the [[Cookhouse]] with 4 Worker slots can be used to boost the Resolve of the [[Lizards]] by assigning four Lizards to it due to its [[Warmth|Warmth Specialization]]. | Some Buildings will indicate that there are Specializations available with small, color-coded icons. You can hold your mouse over these icons to see a tooltip that identifies the name of the Specialization. However, the name does not tell you which of the two types of Specializations it is. Specializations either grant bonus to [[Resolve]] or chance for double production. A Building like the [[Cookhouse]] with 4 Worker slots can be used to boost the Resolve of the [[Lizards]] by assigning four Lizards to it due to its [[Warmth|Warmth Specialization]]. | ||
| Line 83: | Line 96: | ||
|} | |} | ||
[[File: | === First Tab: Recipes === | ||
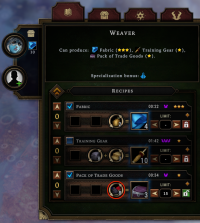
[[File:Building_panel_example-tab_1.png|thumb|200px]] | |||
''See also: [[Recipes]]'' | |||
[[File:Tab-Recipes.png|48px]] | |||
On the Building Panel for production Buildings, the first tab contains the Recipes that the Building can produce. For Buildings like [[Camps]] and [[Farms]], there are no tabs and the Recipes and internal Storage are shown together. | |||
In the list of Recipes, you can check or uncheck the Recipes you want the Workers to produce. By default, all Recipes are enabled. You may want to uncheck to disable Recipes that are lower efficiency than in other Buildings. For example, you may want to disable the Recipe for [[Planks]] in the [[Crude Workstation]] ({{0star]]) once you have built a [[Lumber Mill]] ({{3star}}), so you get the most efficient use of [[Wood]]. However, if your are in need of more Planks and you can afford to spend the extra Wood, it may be worth it to keep the Planks Recipe checked in the Crude Workstation. | |||
In the list of Recipes, you can also click the up and down arrows to increase or decrease the priority of a Recipe. This will reorder the list, so the highest priority Recipes are on top. When a Recipe is prioritized in a Building, the Workers will spend all of their time making that Recipe. Once they are unable to produce more, they will move on to the next-lower priority Recipe. This may happen when the settlement runs out of the ingredient Resources or the Limit is reached. | |||
On the right side of the Recipes list, you can set the [[Limit]] of the Recipe. When the settlement has that number of that product Resource '''in the [[Warehouse]],''' then the Workers will not '''start''' producing more. Sometimes the deliveries to the [[Warehouse]] have not been made yet, so Workers may start another batch, and the Limit may be exceeded, so consider this as a soft target not a rigid constraint. | |||
=== Second Tab: Storage === | |||
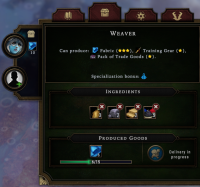
[[File:Building_panel_example-tab_2.png|thumb|200px]] | |||
''See also: [[Storage]] and [[Warehouse]]'' | |||
[[File:Tab-Storage.png|48px]] | |||
=== Produced Goods Storage === | ==== Produced Goods Storage ==== | ||
[[File:Worker panel example-just the storage.png|thumb|300px|The internal Storage in a Woodcutters' Camp is almost full. It has 8 Wood and 6 Copper Ore that need to be delivered to a Warehouse.]] | [[File:Worker panel example-just the storage.png|thumb|300px|The internal Storage in a Woodcutters' Camp is almost full. It has 8 Wood and 6 Copper Ore that need to be delivered to a Warehouse.]] | ||
| Line 102: | Line 128: | ||
In the example screenshot, a [[Woodcutters' Camp]] has an internal Storage capacity of 15. It is holding 8 [[Wood]] and 6 [[Copper Ore]] that are awaiting delivery to the closest Warehouse. The blue button to '''Force delivery now''' is dimmed because a [[Worker]] is on their way back to the Camp to deliver these goods. Pressing this button when the Storage is not full will force a Worker to take the goods to the Warehouse before it is full (and possibly before their own [[Carrying|Carrying Capacity]] would be most efficiently used). This is useful if you have Buildings awaiting construction or Glade Events that need Resources as soon as possible. | In the example screenshot, a [[Woodcutters' Camp]] has an internal Storage capacity of 15. It is holding 8 [[Wood]] and 6 [[Copper Ore]] that are awaiting delivery to the closest Warehouse. The blue button to '''Force delivery now''' is dimmed because a [[Worker]] is on their way back to the Camp to deliver these goods. Pressing this button when the Storage is not full will force a Worker to take the goods to the Warehouse before it is full (and possibly before their own [[Carrying|Carrying Capacity]] would be most efficiently used). This is useful if you have Buildings awaiting construction or Glade Events that need Resources as soon as possible. | ||
=== Ingredients Storage === | ==== Ingredients Storage ==== | ||
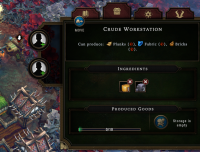
[[File:Internal storage example.png|thumb| | [[File:Internal storage example.png|thumb|200px|The ingredients Storage in an empty Crude Workstation are inaccessible to other Buildings that could use them.]] | ||
In another example, a [[Crude Workstation]] has been replaced with Buildings with more efficient (higher-star) [[Recipes]]. Clicking the red '''X''' icon on the [[Resources|Resource]]'s icons instantly transfers these Resources back to the [[Warehouse]]. If you accidentally remove the wrong ingredient, a [[Worker]] will need to go pick the ingredients back up from the Warehouse before they can work on the Recipe. | In another example, a [[Crude Workstation]] has been replaced with Buildings with more efficient (higher-star) [[Recipes]]. Clicking the red '''X''' icon on the [[Resources|Resource]]'s icons instantly transfers these Resources back to the [[Warehouse]]. If you accidentally remove the wrong ingredient, a [[Worker]] will need to go pick the ingredients back up from the Warehouse before they can work on the Recipe. | ||
== List of Buildings == | |||
=== Starting Buildings === | |||
{|class="wikitable" | |||
|+Buildings every settlement starts with | |||
! Building !! Purpose !! Number of Workers !! Specialization | |||
|- | |||
| [[File:Small Hearth icon.png|128px]] [[Ancient Hearth]] | |||
| Heats nearby [[Housing]]. [[Villagers]] gather here to [[Resting|Rest]], eat, and receive [[Clothing]]. | |||
| 1 | |||
| [[File:Icon_Spec_Fire_64x64.png|16px]] [[Warmth]] | |||
|- | |||
| [[File:Main_Storage_icon.png|128px]] [[Main Warehouse]] | |||
| Stores [[Resources]]. [[Workers]] deliver and take goods from the [[Warehouse]] nearest to them. | |||
| ''none'' | |||
| ''none'' | |||
|} | |||
=== Camps === | |||
''Main article: [[Camps]]'' | |||
[[File:Construct Camps.png|x32px|Camps|link=]] | |||
[[Camps]] are starting points for your settlement to go out into the wild to gather [[Resources]] from the map in a small area around them with an efficiency of one star ({{1Star}}). Selecting a Camp from the construction menu will highlight this collection [[Buildings#Range|range]] and the Resource nodes or [[Trees]] from which the Camp can gather. All camps require [[Parts]] and some require [[Wood]] and take 14 or 15 seconds to be constructed. All Camps can be moved for free. | |||
Camps are starting points for | |||
{| class="wikitable sortable" | |||
{| class="wikitable" | |+ Gathering Camps and what they gather | ||
|- | |- | ||
| | ! Building !!class="unsortable"| Place near this !!class="unsortable"| Primary resource gathered !! Number of workers !! Specialization !!class="unsortable"| Cost to build | ||
|- | |- | ||
| [[File: | | [[File:Forager's Camp icon.png|96px]] [[Foragers' Camp]] | ||
| [[File:DebugNode WormtongueNestSmall icon.png|32px]] [[Wormtongue Nest]] <br /> [[File:DebugNode SwampWheatSmall icon.png|32px]] [[Swamp Wheat Field]] <br /> [[File:DebugNode MossBroccoliSmall icon.png|32px]] [[Moss Broccoli Patch]] | |||
| [[File:Insects.png|32px]] [[Insects]] <br /> [[File:Grain.png|32px]] [[Grain]] <br /> [[File:Vegetables.png|32px]] [[Vegetables]] | |||
| 2 | |||
| [[File:Icon Spec Farm 64x64.png|32px]] [[Farming]] | |||
| 10 [[File:Wood.png|32px]] [[Wood]] AND 3 [[File:Parts.png|32px]] [[Parts]] | |||
|- | |- | ||
| [[File: | | [[File:Harvester Camp icon.png|96px]] [[Harvesters' Camp]] | ||
| [[File:DebugNode FlaxSmall icon.png|32px]] [[Flax Field]] <br /> [[File:DebugNode ReedSmall icon.png|32px]] [[Reed Field]] | |||
| [[File:PlantFiber.png|32px]] [[Plant Fiber]] <br /> [[File:Reeds.png|32px]] [[Reed]] | |||
| 2 | |||
| ''none'' | |||
| 10 [[File:Wood.png|32px]] [[Wood]] AND 3 [[File:Parts.png|32px]] [[Parts]] | |||
|- | |- | ||
| [[File: | | [[File:Herbalist's_Camp_icon.png|96px]] [[Herbalists' Camp]] | ||
| [[File:DebugNode DewberryBushSmall icon.png|32px]] [[Dewberry Bush]] <br /> [[File:DebugNode HerbsSmall icon.png|32px]] [[Herb Node]] <br /> [[File:DebugNode MushroomSmall icon.png|32px]] [[Bleeding Tooth Mushroom]] | |||
| [[File:Berries.png|32px]] [[Berries]] <br /> [[File:Herbs.png|32px]] [[Herbs]] <br /> [[File:Mushrooms.png|32px]] [[Mushrooms]] | |||
| 2 | |||
| [[File:Icon Spec Alchemy 64x64.png|16px]] [[Alchemy]] | |||
| 10 [[File:Wood.png|32px]] [[Wood]] AND 3 [[File:Parts.png|32px]] [[Parts]] | |||
|- | |- | ||
| [[File: | | [[File:Scavenger Camp icon.png|96px]] [[Scavengers' Camp]] | ||
| [[File:DebugNode StormbirdNestSmall icon.png|32px]] [[Stormbird Nest]] <br /> [[File:DebugNode RootsSmall icon.png|32px]] [[Roots Deposit]] | |||
| [[File:Eggs.png|32px]] [[Eggs]] <br /> [[File:Roots.png|32px]] [[Roots]] | |||
| 2 | |||
| ''none'' | |||
| 10 [[File:Wood.png|32px]] [[Wood]] AND 3 [[File:Parts.png|32px]] [[Parts]] | |||
|- | |- | ||
| [[File: | | [[File:Stonecutter's Camp icon.png|96px]] [[Stonecutters' Camp]] | ||
| [[File:DebugNode ClaySmall icon.png|32px]] [[Clay Deposit]] <br /> [[File:DebugNode SeaMarrowSmall icon.png|32px]] [[Sea Marrow Deposit]] <br /> [[File:DebugNode StoneSmall icon.png|32px]] [[Stone Deposit]] | |||
| [[File:Clay.png|32px]] [[Clay]] <br /> [[File:SeaMarrow.png|32px]] [[Sea Marrow]] <br /> [[File:Stone.png|32px]] [[Stone]] | |||
| 2 | |||
| ''none'' | |||
| 10 [[File:Wood.png|32px]] [[Wood]] AND 3 [[File:Parts.png|32px]] [[Parts]] | |||
|- | |- | ||
| [[File: | | [[File:Woodcutters Camp icon.png|96px]] [[Woodcutters' Camp]] | ||
| [[Tree]]s | |||
| [[File:Wood.png|32px]] [[Wood]] | |||
| 3 | |||
| [[File:Icon Spec Wood 64x64.png|16px]] [[Wood Specialization|Wood]] | |||
| 2 [[File:Parts.png|32px]] [[Parts]] | |||
|- | |||
| [[File:Trapper's Camp icon.png|96px]] [[Trappers' Camp]] | |||
| [[File:DebugNode StormbirdNestSmall icon.png|32px]] [[Stormbird Nest]] <br /> [[File:DebugNode SnailBroodmotherSmall icon.png|32px]] [[Slickshell Broodmother]] | |||
| [[File:Eggs.png|32px]] [[Eggs]] <br /> [[File:Meat.png|32px]] [[Meat]] | |||
| 2 | |||
| [[File:Icon_Spec_Meat_64x64.png|16px]] [[Meat Production]] | |||
| 10 [[File:Wood.png|32px]] [[Wood]] AND 3 [[File:Parts.png|32px]] [[Parts]] | |||
|} | |} | ||
== Food Production == | == Food Production == | ||
Revision as of 23:11, 3 December 2022
Buildings are your main way of meeting the Needs of your Villagers by way of gathering, farming, production, and consumption. They occupy map tiles, constrain the movement of Villagers, and offer a variety of capabilities to help your settlement survive.
Blueprints & Construction
Buildings require you to obtain their Blueprint. You start the game with a few Blueprints, which you learn about during the Tutorial. You can choose additional Blueprints by gaining Reputation, buying from Traders, and from Glade Event rewards. A small number of Blueprints are Essential, meaning they will always be unlocked at the beginning of each settlement. You can buy upgrades in the Smoldering City to add a few more Blueprints as Essential for every map (for example, Human House, or be able to choose an Essential Blueprint when Embarking.
Builders
Buildings are constructed by Villagers that aren't assigned to work anywhere else, and they become Builders. If you need a Building built quickly, you will need to dismiss several workers from their workplaces. If no Builders are available, a hammer icon will appear above all Buildings that are awaiting construction, letting you know that you need to dismiss a worker somewhere or the construction will never finish.
Construction Toolbar
Buildings are constructed by selecting from the options at the bottom of the screen and then clicking on the game map where you wish it to be placed. From left to write, the construction icons contain the following options:
 Roads, which are not Buildings, but improve Villagers' ability to move between them
 Camps, and you start most maps with the same 4 options: Woodcutters' Camp, Stonecutters' Camp, Harvesters' Camp, and Scavengers' Camp before being able to choose more Blueprints
 Food Production, for example for farming and cooking Recipes
 Housing, and you start every map with at least the option for the basic Shelter
 Industry Buildings, which produce Resources, sometimes by themselves but usually with Recipes
 City Buildings, which includes Hearths, Warehouses, and the Trading Post, but will also contain Buildings which provide Services when you have choose their Blueprints.
 Decorations, which are also not Buildings, but used to upgrade Hearths
Next to the construction toolbar are the buttons for marking trees (the axe icons). To the far right is the button for destroying Buildings, roads, or deposits.
Range
Depending on the Building you've chosen to build (or move), the game may reveal one or more special overlay areas, highlighting, or icons:
- the range of the Hearth may be shown when placing another Hearth, Houses, or Decorations
- the range of gathering or farming when placing a Camp or Building that requires Fertile Soil
- highlighting of tiles that contain Fertile Soil when placing Farms
- icons of nearby relevant Resources when placing gathering Camps and Mines
- highlighting of Trees that have been marked for cutting in a different color when in range of the Woodcutters' Camp
Most Industry Buildings typically do not need to show any of these things. (The Mine is an exception). For example, when placing a Provisioner, there are no overlays or icons shown.
Building Panel
The Building panel contains information on a Building you have selected or placed for construction on the map. Counter-clockwise starting at the top of the panel, you can see four tabs, the Workers, and the content of the tabs. The center-top of the panel, below the tabs, will show the Building's description, which typically includes a summary of its Recipes and any Specialization.
Moving a Building
If a Building may be moved, the button to do so appears large, in blue, at the top left the Building panel. Holding your mouse over the button will tell you whether the Building may be moved for free, like a Camp. Some Buildings can be moved for a cost, like a Shelter for 5 Wood. Most Buildings that produce goods using Recipes cannot be moved at all, and the icon will not appear on their Building panel.
You can see before constructing a Building whether it will be moveable. This appears on the same tooltip where you can preview the cost of the Building before placing it for construction. In the screenshot to the right, notice the blue Move button on the Building's picture in its construction tooltip.
Workers
Most Buildings have space for two or more Villager to work. Selecting a Building open its panel on the right side of your game window. There, you can assign or dismiss Villagers as Workers.
Next to the Worker icon, like a Human, a small icon will appear that indicates the status of the Worker. They may be the following:
 = walking to the Building
 = actively producing or gathering
 = moving goods from the Building to a Warehouse or vice versa
 = resting at the Hearth
 = idling, unable to work
If the worker is unable to work, then their icon will be an exclamation point. This occurs when there are no more Resources to work with (whether from the nearby map tiles or from the Warehouse) or if you must select one of the options of a Glade Event and press the Investigate button. The Building will also receive an exclamation point icon above it on the map view (even with the Building panel closed) to get your attention since an idling Worker may be wasting valuable time, however you are free to ignore these icons.
Empty Worker Slots

If a Building has space for more Workers, you click the black-and-white icon with a nondescript person and green plus sign to choose which Species to add.
There are noteworthy reasons to leave Worker slots empty in Buildings. For example, emptying the Woodcutters' Camps of all of their Workers just before the Storm can lower the Hostility of the Forest enough so you don't lose any Villagers during the Storm due to low Resolve. Another example is if your settlement is producing a good more quickly than it is needed, removing a Worker will slow down the rate of production.
Specializations
Some Buildings will indicate that there are Specializations available with small, color-coded icons. You can hold your mouse over these icons to see a tooltip that identifies the name of the Specialization. However, the name does not tell you which of the two types of Specializations it is. Specializations either grant bonus to Resolve or chance for double production. A Building like the Cookhouse with 4 Worker slots can be used to boost the Resolve of the Lizards by assigning four Lizards to it due to its Warmth Specialization.
| Specialization | Type | Effect | Species | Example Building |
|---|---|---|---|---|
| Proficiency | +10% chance of doubling their yield | Apothecary | ||
| Comfortable | +5 to their Resolve | Brewery | ||
| Comfortable | +5 to their Resolve | Weaver | ||
| Comfortable | +5 to their Resolve | Mine | ||
| Proficiency | +10% chance of doubling their yield | Small Farm | ||
| Proficiency | +10% chance of doubling their yield | Butcher | ||
| Comfortable | +5 to their Resolve | Ancient Hearth | ||
| Proficiency | +10% chance of doubling their yield | Woodcutters' Camp |
First Tab: Recipes
See also: Recipes
On the Building Panel for production Buildings, the first tab contains the Recipes that the Building can produce. For Buildings like Camps and Farms, there are no tabs and the Recipes and internal Storage are shown together.
In the list of Recipes, you can check or uncheck the Recipes you want the Workers to produce. By default, all Recipes are enabled. You may want to uncheck to disable Recipes that are lower efficiency than in other Buildings. For example, you may want to disable the Recipe for Planks in the Crude Workstation ({{0star]]) once you have built a Lumber Mill (Template:3star), so you get the most efficient use of Wood. However, if your are in need of more Planks and you can afford to spend the extra Wood, it may be worth it to keep the Planks Recipe checked in the Crude Workstation.
In the list of Recipes, you can also click the up and down arrows to increase or decrease the priority of a Recipe. This will reorder the list, so the highest priority Recipes are on top. When a Recipe is prioritized in a Building, the Workers will spend all of their time making that Recipe. Once they are unable to produce more, they will move on to the next-lower priority Recipe. This may happen when the settlement runs out of the ingredient Resources or the Limit is reached.
On the right side of the Recipes list, you can set the Limit of the Recipe. When the settlement has that number of that product Resource in the Warehouse, then the Workers will not start producing more. Sometimes the deliveries to the Warehouse have not been made yet, so Workers may start another batch, and the Limit may be exceeded, so consider this as a soft target not a rigid constraint.
Second Tab: Storage
See also: Storage and Warehouse
Produced Goods Storage
Most buildings have internal storage, where (a) gathered or produced Resources are kept until a batch can be taken to the Warehouse or (b) input Resources are brought from the Warehouse for processing. The capacity of this Storage can be increased by Perks and Upgraded in the Smoldering City.
In the example screenshot, a Woodcutters' Camp has an internal Storage capacity of 15. It is holding 8 Wood and 6 Copper Ore that are awaiting delivery to the closest Warehouse. The blue button to Force delivery now is dimmed because a Worker is on their way back to the Camp to deliver these goods. Pressing this button when the Storage is not full will force a Worker to take the goods to the Warehouse before it is full (and possibly before their own Carrying Capacity would be most efficiently used). This is useful if you have Buildings awaiting construction or Glade Events that need Resources as soon as possible.
Ingredients Storage
In another example, a Crude Workstation has been replaced with Buildings with more efficient (higher-star) Recipes. Clicking the red X icon on the Resource's icons instantly transfers these Resources back to the Warehouse. If you accidentally remove the wrong ingredient, a Worker will need to go pick the ingredients back up from the Warehouse before they can work on the Recipe.
List of Buildings
Starting Buildings
| Building | Purpose | Number of Workers | Specialization |
|---|---|---|---|
| Heats nearby Housing. Villagers gather here to Rest, eat, and receive Clothing. | 1 | ||
| Stores Resources. Workers deliver and take goods from the Warehouse nearest to them. | none | none |
Camps
Main article: Camps
![]()
Camps are starting points for your settlement to go out into the wild to gather Resources from the map in a small area around them with an efficiency of one star (★). Selecting a Camp from the construction menu will highlight this collection range and the Resource nodes or Trees from which the Camp can gather. All camps require Parts and some require Wood and take 14 or 15 seconds to be constructed. All Camps can be moved for free.
| Building | Place near this | Primary resource gathered | Number of workers | Specialization | Cost to build |
|---|---|---|---|---|---|
| 2 | 10 | ||||
| 2 | none | 10 | |||
| 2 | 10 | ||||
| 2 | none | 10 | |||
| 2 | none | 10 | |||
| Trees | 3 | 2 | |||
| 2 | 10 |
Food Production
Farm fields can only be constructed on fertile soil around food production buildings. Food production buildings receive Farming specialization bonuses.
Housing
Housing buildings have to be constructed near the Hearth and satisfy the need for Shelter and usually Housing. All housing buildings take 40 seconds to be constructed.
Industry
Industry buildings can produce various Recipes.
- Brewery has the Brewing specialization
| Building | Cost | Recipes |
|---|---|---|
| File:Simple Tools.png Simple Tools File:Trade Goods.png Pack of Trade Goods |
City Buildings
Blights Posts and Hydrants can only be constructed if the game difficulty is at least Veteran.
Decorations
Decorations are used to advance hubs. All decorations take 10 seconds to be constructed.
| Decoration | Bonus | Cost |
|---|---|---|
| Comfort | ||
| Aesthetics | ||
| Harmony | ||
 Hooded Horse Wikis