Beginner's Guide
Movement controls
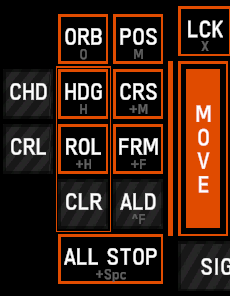
The movement controls are accessed by opening the Action Menu and pressing the MOVE button. If a formation action menu is opened movement controls will be applied to the guide ship.
| Display | Setting | Effects |
|---|---|---|
| ORB | Orbit Position | Move to a designated area and orbit around it |
| POS | Move To Position | Move to a designated area and hold position |
| CHD | Clear Hold Heading | Cancels a Hold Heading command |
| HDG | Hold Heading | Face the selected direction regardless of heading |
| CRS | Drive Course | Travel in a direction indefinitely |
| CRL | Clear Roll Ship | Cancels a Roll Ship command |
| ROL | Roll Ship | Selects a new direction as the "up" direction of the ship |
| FRM | Form With Ship | Choose a ship to become a guide ship and then designate a position around it |
| CLR | Clear HDG/ROL | Cancels Hold Heading and Roll Ship commands |
| ALD | Assume Lead | Become the new guide ship of the formation |
| ALL STOP | Hold Position | Cancels all movement commands |
Tactics
- ORB / Orbit Position allows most weapons to have a good angle on the target. However it also exposes the same armor side continuously, which can be whittled down with enough fire.
- HDG / Hold Heading can be used to avoid exposing the main engines, drive module and reactor to enemy fire but the ships will have less acceleration.
- ROL / Roll Ship can be used to keep certain weapons or radar panels angled at an enemy ship. Ships can roll faster than enemy ships of the same size can position around them.
- ALD / Assume Lead is useful if the guide ship becomes disabled but the rest of the fleet need to carry on with their objective.
Weapon controls
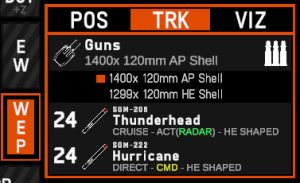
The weapon controls are accessed by opening the Action Menu and pressing the WEP button. The top bar displays the current targeting mode. TRK means the ship is using radar targeting, while VIZ means the ship is using optical targeting. POS is highlighted when targeting empty space and allows direct firing of weapons in any direction. Not all weapons support VIZ and POS mode.
Pressing the ammo button next to a kinetic weapon will show the available ammo types.
- AP (Armor Piercing) ammo is more effective against armor but will only deal internal damage directly in the shell's path.
- HE (High Explosive) ammo is less effective against armor but will only deal internal damage to everything nearby the impact area.
Tactical view
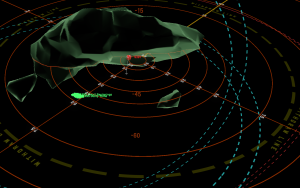
The tactical view displays a lot of information that is normally hidden.
If a ship is selected the tactical view will show a distance range plane around it. The dotted lines represent the maximum ranges for the selected ship's systems. The red line indicates offensive weapons range, the blue line indicates sensor range and the green line indicates defensive systems range.
Detecting enemies
Enemy ships can be detected in two ways: by radar and by visual. Both can be obstructed by asteroids.
- Radar detection is shared across the entire fleet as long as a ship's communications are online and allows all of a ship's weapons to fire on a detected target. Each ship has a number of radar panels that give full coverage around the ship. Radar panels or the radar controller can be destroyed, impairing radar functionality. Radar can also be jammed.
- Visual detection applies in a 3 km area around any ship and is not shared across the fleet. Enemies detected by visual will only be visible if the ship detecting them is selected and cannot be attacked by other ships unless those also detected the enemy. Most offensive weapons can fire on visually detected enemies if radar detection is not functional but directly controlled missiles cannot.
Damage control
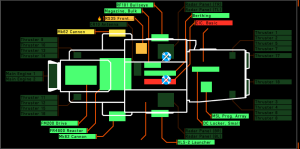
Battle damage may case a fire inside a ship, indicated with an icon in the ships list. Fires cause constant damage to a ship and slow the working speed of damage control teams.
Damage control teams will attempt to repair damaged components. They will prioritize them in the order of how important a component is, with the CIC and reactor always being repaired first. Priority can be changed manually but repair teams will have to travel to the newly designated component to repair it, possibly taking up valuable time.
There is a limit to how much a component can be repaired. Maximum repair is 10% more than the component had at the beginning of the repairs.
If a component has been destroyed completely, repairing it will require spending a Restoration Point, which can only be done manually. Each ship carries only a limited number of Restoration Points, depending on damage control components installed.
 Hooded Horse Wikis


