Complex Food Needs: Difference between revisions
From Against the Storm Official Wiki
(edited for readability) |
(Added strategy section adding advice based on which Species is missing. Moved diagram into big thumbnail. Added Coats for quick reference.) |
||
| Line 1: | Line 1: | ||
Villagers prefer to eat Complex Food, like [[Pie]], instead of Raw Food, like [[Roots]]. While this need is satisfied, the Villager will get a bonus to their [[Resolve]]. | [[Villagers]] prefer to eat Complex Food, like [[Pie]], instead of Raw Food, like [[Roots]]. While this need is satisfied, the Villager will get a bonus to their [[Resolve]]. | ||
[[Species]] differ in which of the [[Resources#Complex_Food|Complex Food Goods]] they need. Species who do not want a certain food will not take it while resting. | [[Species]] differ in which of the [[Resources#Complex_Food|Complex Food Goods]] they need. Species who do not want a certain food will not take it while resting. | ||
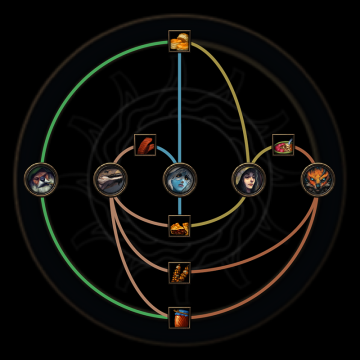
The following lists summarize these needs by Species, then by food. Also included for quick reference are [[Coats]]. Although they satisfy a different need, they are used like Food when Villagers rest at a [[Hearth]]. | |||
[[File:Species Complex Food Needs.png|thumb|360px|This diagram illustrates the connections between Species and Complex Food (and Coats).]] | |||
{| class="wikitable" | {| class="wikitable" | ||
! By Species !! By Food | ! By Species !! By Food | ||
| Line 11: | Line 14: | ||
## [[File:Jerky.png|32px]] [[Jerky]] | ## [[File:Jerky.png|32px]] [[Jerky]] | ||
## [[File:Pie.png|32px]] [[Pie]] | ## [[File:Pie.png|32px]] [[Pie]] | ||
## [[File:Coats.png|32px]] [[Coats]] | |||
# [[Beaver]] | # [[Beaver]] | ||
## [[File:Biscuits.png|32px]] [[Biscuits]] | ## [[File:Biscuits.png|32px]] [[Biscuits]] | ||
## [[File:PickledGoods.png|32px]] [[Pickled Goods]] | ## [[File:PickledGoods.png|32px]] [[Pickled Goods]] | ||
## [[File:Coats.png|32px]] [[Coats]] | |||
# [[Lizard]] | # [[Lizard]] | ||
## [[File:Jerky.png|32px]] [[Jerky]] | ## [[File:Jerky.png|32px]] [[Jerky]] | ||
| Line 23: | Line 28: | ||
## [[File:Jerky.png|32px]] [[Jerky]] | ## [[File:Jerky.png|32px]] [[Jerky]] | ||
## [[File:Skewers.png|32px]] [[Skewers]] | ## [[File:Skewers.png|32px]] [[Skewers]] | ||
| | |||
# [[File:Biscuits.png|32px]] [[Biscuits]] | # [[File:Biscuits.png|32px]] [[Biscuits]] | ||
## [[Human]] | ## [[Human]] | ||
| Line 42: | Line 46: | ||
## [[Lizard]] | ## [[Lizard]] | ||
## [[Harpy]] | ## [[Harpy]] | ||
# [[File:Coats.png|32px]] [[Coats]] | |||
## [[Human]] | |||
## [[Beaver]] | |||
|} | |} | ||
== Strategy == | |||
Based on the combinations above and which Species are in your map: | |||
* '''If you don't have Harpies in your map, then avoid Skewers.''' All other choices are fine, because they will serve exactly two of your Species. | |||
* '''If you don't have Lizards in your map, then Biscuits will serve everyone.''' Missing Lizards mean Pie, Pickled Goods, and Skewers all serve only one Species. | |||
* '''If you don't have Beavers in your map, then Jerky will serve everyone.''' Pickled Goods will only serve one Species. (Note that Coats may not be worth investing in either.) | |||
* '''If you don't have Humans in your map, then avoid Pie.''' All other choices are fine, because they will serve exactly two of your Species. (Note that Coats may not be worth investing in either.) | |||
Revision as of 01:05, 14 November 2022
Villagers prefer to eat Complex Food, like Pie, instead of Raw Food, like Roots. While this need is satisfied, the Villager will get a bonus to their Resolve.
Species differ in which of the Complex Food Goods they need. Species who do not want a certain food will not take it while resting.
The following lists summarize these needs by Species, then by food. Also included for quick reference are Coats. Although they satisfy a different need, they are used like Food when Villagers rest at a Hearth.
| By Species | By Food |
|---|---|
Strategy
Based on the combinations above and which Species are in your map:
- If you don't have Harpies in your map, then avoid Skewers. All other choices are fine, because they will serve exactly two of your Species.
- If you don't have Lizards in your map, then Biscuits will serve everyone. Missing Lizards mean Pie, Pickled Goods, and Skewers all serve only one Species.
- If you don't have Beavers in your map, then Jerky will serve everyone. Pickled Goods will only serve one Species. (Note that Coats may not be worth investing in either.)
- If you don't have Humans in your map, then avoid Pie. All other choices are fine, because they will serve exactly two of your Species. (Note that Coats may not be worth investing in either.)
 Hooded Horse Wikis
