Beginner's Guide: Difference between revisions
(→Difficulty: Removed hardcoded styling; put little lists into the table instead of hardcoded line breaks) |
|||
| Line 135: | Line 135: | ||
:''Main Article: [[Difficulty]]'' | :''Main Article: [[Difficulty]]'' | ||
{| class= | {| class=wikitable | ||
! Difficulty !! Blightrot & | ! Difficulty !! Blightrot & Corruption !! Seasonal Conditions | ||
! Max Hostility !! Hostility Multiplier !! Other Effects | |||
! Experience per Win !! Base Reward | |||
|- | |- | ||
| '''Settler''' | | '''Settler''' || No || | ||
| No | * 2 Positive | ||
* 1 Negative | |||
| 6 | | 6 || 1x || | ||
| 1x | * 12 Reputation required to win. | ||
* Villagers eat 35% less food. | |||
| 30 | * 12 Total Orders Available. | ||
| 21 Food Stockpiles | | 30 xp || '''21''' {{rl|Food Stockpiles}} | ||
|- | |- | ||
| '''Pioneer''' | | '''Pioneer''' || No || | ||
| No | * 2 Positive | ||
* 3 Negative | |||
| 9 | | 9 || 1.5x || | ||
| 1.5x | * 14 Reputation required to win. | ||
* 11 Total Orders Available. | |||
| 70 | | 70 xp || '''42''' {{rl|Food Stockpiles}} | ||
| 42 Food Stockpiles | |||
|- | |- | ||
| '''Veteran''' | | '''Veteran''' || Yes || | ||
| Yes | * 1 Positive | ||
* 4 Negative | |||
| 16 | | 16 || 2x || | ||
| 2x | * 14 Reputation required to win. | ||
* 10 Total Orders Available. | |||
| 140 | | 140 xp || '''70''' {{rl|Food Stockpiles}} | ||
| 70 Food Stockpiles | |||
|- | |- | ||
| '''Viceroy''' | | '''Viceroy''' || Yes || | ||
| Yes | * 1 Positive | ||
* 4 Negative | |||
| 31 | | 31 || 3x || | ||
| 3x | * 14 Reputation required to win. | ||
* 9 Total Orders Available. | |||
| 175 | | 175 xp || '''91''' {{rl|Food Stockpiles}} | ||
| 91 Food Stockpiles | |||
|} | |} | ||
== Standard Opening (a.k.a. "the Meta") == | == Standard Opening (a.k.a. "the Meta") == | ||
Revision as of 02:27, 24 December 2023
Greetings, Viceroy!
Newcomers are encouraged to read this article before exploring the main articles and the rest of the information on this wiki. There are deep systems and mechanics that compound and can feel complicated quickly. So let's start with the absolute basics.
![]()
If you have just started the game for the first time and want to get everything out of the first tutorial with clear, step-by-step instructions and explanations that will jump-start your understanding of the game without overwhelming you with depth, head over to the Tutorial Walkthrough and come back to this after you finish the first mission.
Winning and Losing
A mission is won when the entire blue Reputation Bar is filled.
A mission is lost when the entire red Queen's Impatience Bar is filled, or when all villagers leave or die.
Reputation Points
- Main Article: Reputation
Gaining a Reputation point lowers the Queen's Impatience, granting you more time to complete the mission. You can earn Reputation Points several ways:
- Completing Orders: Each completed Order grants 1 Reputation point. This will likely be the source of the first Reputation point you earn each mission.
- Solving Glade Events: Your choices when solving Glade Events may reward you with Reputation. You will earn more from solving events in Dangerous and Forbidden Glades than you will from events in Small Glades.
- Villagers Resolve: Once a species' Resolve reaches a certain threshold (indicated by a blue mark around their portrait), they will start to generate Reputation. Larger populations generate more Reputation per minute. With time, the villagers will become accustomed to their living conditions, raising their threshold and requiring more complex needs to be satisfied before they will again generate Reputation. This will likely be your primary source of Reputation in most of your missions.
- Earning Perks and Cornerstones: Some Cornerstones grant Reputation when you accomplish something, like trading a certain amount.
- Forest Mysteries: Some modifiers and mysteries grant extra Reputation when you, for example, solve a Dangerous or Forbidden Glade Event while the modifier is active, for example, during a particular season.
Orders
After a certain amount of time, the Citadel will offer you new options for new Orders. You may choose one to complete, and your choices affect which Orders you may choose from in the future. You can see your Orders, new options, and the timers until you get your next choices by clicking the envelope icon at the top-right of the game window.
Orders will reward you with 1 Reputation and additional rewards, such as stacks of goods or additional villagers. Each pair of orders is more difficult than the previous one. At higher difficulties, fewer Orders will be available over the course of the mission, requiring you to gain your Reputation through other means.
Glade Events
- Main Article: Glade Events
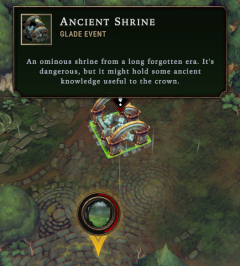
Glade Events are diverse challenges that are found in the glades uncovered by cutting through the forest. They vary widely, and some require you to act quickly, starting from the moment the glade is opened.
- Caches of goods, requiring
 Stone or
  Tools that you can open for yourself or send back to the Citadel.
 - Camps of villagers, requiring food, that you can choose to recruit to your settlement or send back to the Citadel.
- Abandoned buildings that you can choose to repair to use yourself or salvage for their resources.
- Larger events that might be cleansing shrines, investigating villager remains, dealing with strange creatures and spells, and Rainpunk machines. All have negative effects if you leave them alone for too long. Remember to take into account how long it will take your villagers to solve the challenge!
- The Cursed Royal Woodlands is haunted by ghosts that make challenging requests of you. If you fulfill their requests, they reward you with opened caches.
- Seals that create plagues, and more for you to discover!
Seasonal Conditions
- Main Article: Seasons
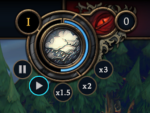
The three seasons (Drizzle, Clearance, and Storm) bring beneficial and harmful changes. They are displayed in the top middle of the screen, to the right of the time controls. You'll face fewer beneficial and more and increasingly dangerous modifiers at higher difficulties.
Negative modifiers often reduce Resolve based on the level of the Hostility of the Forest. These can be avoided entirely as long as the modifier's conditions are met or as long as you manage Hostility so that it doesn't activate in the first place.
Beneficial conditions are only active during the drizzle period while harmful ones only activate during the storm.
Hostility of the Forest
- Main Article: Hostility
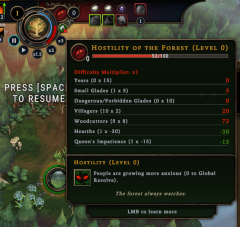
Hostility represents the Forest's dread and darkness and its potential to harm your villagers and their villagers' Resolve. Alongside the Queen's Impatience, which acts as a passive timer, Hostility is the main pressure on you to finish your mission before its effects devastate your settlement.
Since Hostility increases over time unless managed by the Viceroy, the Storm get more difficult to survive as the years go on. By accepting more villagers, claiming Cornerstones, and unlocking more building Blueprints, you improve your ability to provide villagers with housing and satisfy their needs for goods and services. Your goal is to finish the mission before time runs out (the Queen's Impatience) and before the Forest gets too dangerous (Hostility of the Forest).
At the top center of the game window, Hostility is displayed as a number. For every 100 points, the Hostility level increases. This Hostility level is often used as a multiplier to negative effects. Each settlement starts with Hostility at 0, and over the course of your mission as your settlement grows and you expand, Hostility rises, sometimes quickly.
You will have to manage Hostility. During the Storm, stackable negative Forest Mysteries trigger, each generating different negative effects.
Hostility is affected by the following:
- Increases for every year passed
- Increases for every villager in your settlement
- Increases much more if your villagers are assigned as woodcutters
- Increases for every opened glade, with a smaller increase from Small Glades than from Dangerous and Forbidden Glades
- Increases from the negative effects of Glade Events you are working on, sometimes by as much as 500 (5 whole levels)
- Decreases from some cornerstones
- Decreases from building and fueling additional Hearths
- Decreases from sacrificing fuel in the Hearth, although it is expensive
- Decreases with Impatience—so as time is running out, the Storms are slightly easier to weather
Resolve
- Main Article: Resolve
A villager's Resolve represents their willingness to stay in the village. Below the species' portrait is one or sometimes two numbers. Always shown is the current Resolve value. If their Resolve is changing, a second number will show the Resolve value that the species will end up with if conditions stay the same. Even though villagers have individual values for resolve, only the average shown in the Species UI affects gameplay.
Villagers Leaving from Low Resolve
When the Storm arrives or when interacting with Glade Events, villagers face significant penalties to their Resolve. If their Resolve reaches or falls below zero, a random villager of that species will leave the settlement. Once it reaches zero, a red timer indicator will sweep around their portrait, indicating the time until a villager leaves. This timer repeats: If Resolve stays at or below zero long enough, more villagers will leave. When each villager leaves, the Queen's Impatience also increases by a fraction of a point. Resolve mismanagement can snowball into a complete mission loss if, for example, the villagers who leave were gathering food or fuel, were providing critical functions like keeping the Hearth fueled, or were solving a Glade Event with a powerful negative effect.
It takes time for species' Resolve to drop to zero due to the Storm and other penalties, and then the red timer has to finish sweeping around their portrait before a villager leaves. Therefore, if your villagers start the Storm with high Resolve, you may have enough time even after the Storm starts to make any quick adjustments to keep your villagers from leaving before the end of the Storm.
Gaining Reputation from High Resolve
As mentioned above in the introduction to Reputation, if a species' Resolve exceeds a certain threshold, the Viceroy gradually earns Reputation. The amount earned depends on the species, population, Perks and Cornerstones, and more. When a species' Resolve is earning you Reputation, their portrait lights up light blue.
Bonuses and Penalties to Resolve
The following affect Resolve:
- Increases slightly when species' need for Shelter is satisfied
- Increases when species' need for their Species-specific Housing is satisfied
- Increases when their need for Complex Food is satisfied
- Increases significantly when their need for Services is satisfied
- Increases or decreases from certain Perks and Cornerstones
- Increases for one species when they are favored by the Viceroy (but keep reading)
- Decreases for the other two species when the other is favored by the Viceroy
- Decreases significantly from negative Forest Mysteries that are active during the Storm
- Decreases significantly from being hungry (when they go to rest at the Hearth and there is no food available), especially because this effect stacks for every missed opportunity to eat
- Decreases from Glade Events that have temporary penalties while they are being worked on
- Decreases from Glade Events that were not solved in time and cause a permanent penalty
- Decreases massively when the Hearth runs out of fuel, since it compounds with losing the increases gained from your satisfying their needs for Shelter or their Species-specific Housing when their houses go cold
Difficulty
- Main Article: Difficulty
| Difficulty | Blightrot & Corruption | Seasonal Conditions | Max Hostility | Hostility Multiplier | Other Effects | Experience per Win | Base Reward |
|---|---|---|---|---|---|---|---|
| Settler | No |
|
6 | 1x |
|
30 xp | 21 |
| Pioneer | No |
|
9 | 1.5x |
|
70 xp | 42 |
| Veteran | Yes |
|
16 | 2x |
|
140 xp | 70 |
| Viceroy | Yes |
|
31 | 3x |
|
175 xp | 91 |
Standard Opening (a.k.a. "the Meta")
Consider the following for your first year of your first mission. After that, you will need to adapt to the Forest Modifiers, Cornerstones, Blueprints, and resources available on your map.
- Disable coal consumption since it is far more valuable than Wood because it can solve Glade Events (with a full stack of 30).
- Choose your best available Firekeeper worker at your Hearth.
- Assign a Lizard to gain +1 to everyone's Resolve if this gets you over a species' threshold. If you have only one Lizard, then they get an additional +5 for working in the Hearth with the
 Warmth Specialization—if you have more than one, this large bonus will get averaged away.
 - Assign a Harpy to gain their powerful Firekeeper bonus of +5 to every villagers' carrying capacity.
- Assign a Beaver early on to save fuel burned at Hearth.
- Assign a Human to slow down the rate at which the Queen's Impatience increases.
- Assign a Lizard to gain +1 to everyone's Resolve if this gets you over a species' threshold. If you have only one Lizard, then they get an additional +5 for working in the Hearth with the
- Build two Woodcutters' Camp and start clearing trees in the direction of a Dangerous Glade, but do not allow them to open it yet.
- Build a few plain roads, at least to connect your Main Warehouse to the Hearth.
- Build three Shelters and four tiles of decorations to upgrade the Hearth for the bonus to Resolve.
- Build a Crude Workstation to start getting building materials.
- Build gathering camps that can gather from the resource deposits you started with.
- Choose your first Orders based on what you can see on the map.
- Choose your first Blueprints based on the products they make: focus on food first. Match the icons next to the species' portraits to the food goods the buildings make. Humans like Biscuits, for example.
- Build a Trading Post during the first Storm. You will try to use what the first Trader sells to help you solve your first Dangerous Glade Event.
- Build one of your Blueprints.
- At the beginning of Year 2, after the first Storm, open the first Dangerous Glade and do everything you can to solve it.
Final Summary
- Reputation wins you the mission. The Queen's Impatience running out makes you lose the mission.
- Gaining Reputation reduces the Queen's Impatience.
- Hostility lowers Resolve during the Storm.
- High Impatience reduces Hostility.
- Time in game (years) increases Hostility.
- Opening Glades increases Hostility, but enables more production by revealing new resources and rewards.
- Being able to produce Complex Foods and goods for Services boosts Resolve, allowing you to withstand higher Hostility.
- Every mission is about balancing these pressures and priorities.
 Hooded Horse Wikis


