Rainpunk: Difference between revisions
mNo edit summary |
|||
| (42 intermediate revisions by 6 users not shown) | |||
| Line 1: | Line 1: | ||
{{Version|1.6.2}} | |||
[[File:RainPunk.png|thumb|200%|A Stormwater Geyser]] | [[File:RainPunk.png|thumb|200%|A Stormwater Geyser]] | ||
= Overview = | == Overview == | ||
[[File:Icon_Rainpunk_LowStrain.png|94px|left|border|Rain Engines]] Viceroys can now take advantage of the Rain to power their buildings, but not without a cost! [[Blightrot]] will grow in [[Rain Engines]] as Viceroys use them, the more [[Rainwater]] that runs through an engine, the faster [[File:Icon_UI_Blightrot.png|16px]] Blightrot Cysts will spawn. While Rainpunk is essential for any Viceroy playing on higher difficulties, it is a delicate balance between using Rainwater Engines and keeping the Blightrot at bay, as Blightrot likes to eat villagers. Blightrot scales with difficulty, so prepare to fight for your life at higher [[Prestige]] levels... | [[File:Icon_Rainpunk_LowStrain.png|94px|left|border|Rain Engines]] Viceroys can now take advantage of the Rain to power their buildings, but not without a cost! [[Blightrot]] will grow in [[Rain Engines]] as Viceroys use them, the more [[Rainwater]] that runs through an engine, the faster [[File:Icon_UI_Blightrot.png|16px]] Blightrot Cysts will spawn. While Rainpunk is essential for any Viceroy playing on higher difficulties, it is a delicate balance between using Rainwater Engines and keeping the Blightrot at bay, as Blightrot likes to eat villagers. Blightrot scales with difficulty, so prepare to fight for your life at higher [[Prestige]] levels... | ||
== Types of Rainwater == | == Types of Rainwater == | ||
There are 3 types of Rainwater | There are 3 types of Rainwater: Each type will power a different type of building. [[File:DrizzleWaterCircle.png|16px]] [[Drizzle Water]] powers buildings that produce food, [[File:ClearanceWaterCircle.png|16px]] [[Clearance Water]] powers crafting and artistry buildings, and [[File:StormWaterCircle.png|16px]] [[Storm Water]] powers heavy industrial buildings that produce fuels and metals. | ||
<br /> | <br /> | ||
{| class="wikitable" | {| | ||
|- style="font-weight:bold; text-align:center;" | |- style="vertical-align:top; border-width: 0" | ||
| | |||
{| class="wikitable" | |||
|- style="font-weight:bold; text-align:center" | |||
! [[File:DrizzleWaterCircle.png|16px]] Drizzle Water | |||
|- | |||
| {{bl|Apothecary|medium}} | |||
|- | |||
| {{bl|Bakery|medium}} | |||
|- | |||
| {{bl|Beanery|medium}} | |||
|- | |||
| {{bl|Brewery|medium}} | |||
|- | |||
| {{bl|Butcher|medium}} | |||
|- | |||
| {{bl|Cannery|medium}} | |||
|- | |||
| {{bl|Cellar|medium}} | |||
|- | |||
| {{bl|Cookhouse|medium}} | |||
|- | |||
| {{bl|Distillery|medium}} | |||
|- | |||
| {{bl|Field Kitchen|medium}} | |||
|- | |||
| {{bl|Furnace|medium}} | |||
|- | |||
| {{bl|Granary|medium}} | |||
|- | |||
| {{bl|Greenhouse|medium}} | |||
|- | |||
| {{bl|Grill|medium}} | |||
|- | |||
| {{bl|Pantry|medium}} | |||
|- | |||
| {{bl|Ranch|medium}} | |||
|- | |||
| {{bl|Smokehouse|medium}} | |||
|- | |||
| {{bl|Teahouse|medium}} | |||
|- | |||
| {{bl|Tinctury|medium}} | |||
|} | |||
| | |||
{| class="wikitable" | |||
|- style="font-weight:bold; text-align:center" | |||
! [[File:ClearanceWaterCircle.png|16px]] Clearance Water | |||
|- | |||
| {{bl|Alchemist's Hut|medium}} | |||
|- | |||
| {{bl|Artisan|medium}} | |||
|- | |||
| {{bl|Brick Oven|medium}} | |||
|- | |||
| {{bl|Clay Pit|medium}} | |||
|- | |||
| {{bl|Clothier|medium}} | |||
|- | |||
| {{bl|Cobbler|medium}} | |||
|- | |||
| {{bl|Cooperage|medium}} | |||
|- | |||
| {{bl|Druid's Hut|medium}} | |||
|- | |||
| {{bl|Finesmith|medium}} | |||
|- | |||
| {{bl|Leatherworker|medium}} | |||
|- | |||
| {{bl|Makeshift Post|medium}} | |||
|- | |||
| {{bl|Press|medium}} | |||
|- | |||
| {{bl|Provisioner|medium}} | |||
|- | |||
| {{bl|Rain Mill|medium}} | |||
|- | |||
| {{bl|Scribe|medium}} | |||
|- | |||
| {{bl|Stamping Mill|medium}} | |||
|- | |||
| {{bl|Supplier|medium}} | |||
|- | |||
| {{bl|Weaver|medium}} | |||
|} | |||
| | |||
{| class="wikitable" | |||
|- style="font-weight:bold; text-align:center" | |||
! [[File:StormWaterCircle.png|16px]] Storm Water | |||
|- | |||
| {{bl|Brickyard|medium}} | |||
|- | |||
| {{bl|Carpenter|medium}} | |||
|- | |||
| {{bl|Crude Workstation|medium}} | |||
|- | |||
| {{bl|Kiln|medium}} | |||
|- | |||
| {{bl|Lumber Mill|medium}} | |||
|- | |||
| {{bl|Manufactory|medium}} | |||
|- | |||
| {{bl|Rainpunk Foundry|medium}} <!-- added since it wasn't in list. I haven't built one yet. --> | |||
|- | |||
| {{bl|Smelter|medium}} | |||
|- | |||
| {{bl|Smithy|medium}} | |||
|- | |||
| {{bl|Tinkerer|medium}} | |||
|- | |||
| {{bl|Toolshop|medium}} | |||
|- | |||
| {{bl|Workshop|medium}} | |||
|} | |||
|} | |||
== Sourcing Rainwater == | |||
[[File:Rain Collector icon.png|right|thumb|150px|A Rainwater Collector]] | |||
There are two ways of sourcing Rainwater: | |||
* Collecting Rainwater from the sky via buildings such as the [[Rain Collector]] and [[Advanced Rain Collector]]. | |||
* Building a {{bl|Geyser Pump}} on top of Water Geysers. | |||
=== Rainwater Collectors === | |||
[[File:Geysers.png|right|thumb|150px|A Geyser and Geyser Pump]] Most players will start with building a Rain Collector that collects Rainwater during the season. Collection is based on seasons, so [[File:StormWaterCircle.png|16px]] [[Storm Water]] can only be collected during the [[Storm Season]], and so forth. Rain Collectors have tanks with a capacity of 50 units and collect 2 units every 16 seconds, and Advanced Rain Collectors, which you unlock in later levels, has double the capacity and speed.<br /> | |||
=== Rainwater Geysers === | |||
A {{bl|Geyser Pump}} is a building you can place on top of Rainwater Geysers to collect Rainwater, they have a base capacity of 50 units, upgradable to 100 units. Geysers produce 2 units of water every 6 seconds. They have two worker slots, upgradable to place two Automatons in worker slots for uninterrupted collection. It is important to note that a Rainwater Geyser will only produce Rainwater of the type that is the colour of the geyser, it does not change with seasons. | |||
<br/><br/><br/> | |||
{| class="wikitable" style="text-align:center;" | |||
|+Chance of Geyser type per Glade type*<sup>[[#References |[1]]]</sup> | |||
|- | |||
! | |||
! [[File:DrizzleWaterCircle.png|16px]] Drizzle | |||
! [[File:ClearanceWaterCircle.png|16px]] Clearance | ! [[File:ClearanceWaterCircle.png|16px]] Clearance | ||
! [[File:StormWaterCircle.png|16px]] Storm | ! [[File:StormWaterCircle.png|16px]] Storm | ||
|- | |- | ||
| | ! scope="row"| Small | ||
| | | 60% | ||
| | | 25% | ||
| 15% | |||
|- | |- | ||
| | ! scope="row"| Dangerous | ||
| | | 33% | ||
| | | 33% | ||
| 33% | |||
|- | |- | ||
| | ! scope="row"| Forbidden | ||
| 15% | |||
| 35% | |||
| 50% | |||
|}*assuming the Glade does have a Geyser | |||
| | |||
| | |||
| | |||
|} | |||
* | |||
== Engine Usage == | == Engine Usage == | ||
[[File: | [[File:InstallRainEngines.png|450px|left|Install Panel]][[File:RainwaterEngineControls.png|450px|right|Engine Controls]]{{Clear}} | ||
Viceroys can control how much water, and for what purpose, is used in a [[Building]]. To the left we can see a Viceroy clicked on the 3rd panel of a [[Building]] information box to open the engine controls of a {{bl|Manufactory| | Viceroys can control how much water, and for what purpose, is used in a [[Building]]. | ||
To the left we can see a Viceroy clicked on the 3rd panel of a [[Building]] information box to open the engine controls of a {{bl|Manufactory|medium}}. | |||
We can see: | |||
# The 3rd panel with Rainpunk Information. | |||
# The option and cost associated with installing Rainpunk. | |||
On the right, we see: | |||
# The 3rd panel with Rainpunk Information. | |||
# The Controls. Click '''on''' this button with LMB to increase, and RMB to decrease usage. | |||
# The Blightrot meter. Viceroys can '''hover''' on this panel so see how much [[Blightrot]] is being generated. | |||
</br> | |||
Engine Controls are as follows: | Engine Controls are as follows: | ||
Left: | Left: (Uses 2 Units of Water per Level per Recipe / Minute ) | ||
*1 - Increase production speed by 50%. | *1 - Increase production speed by 50%. | ||
*2 - Increase chance of double production yields by 25%. | *2 - Increase chance of double production yields by 25%. | ||
*3 - Increase production speed by a further 50%. | *3 - Increase production speed by a further 50%. | ||
Right: | Right: (Uses 1 Unit of Rainwater per Level per Worker / Minute) | ||
*1 - Workers gain 5 [[Resolve]]. | *1 - Workers gain 5 [[Resolve]]. | ||
*2 - Workers gain a further 5 [[Resolve]] | *2 - Workers gain a further 5 [[Resolve]] | ||
It is important to note that as long as there are workers assigned and the secondary resolve-boosting engines are turned on, the Rainwater will be used and Blightrot will generate, '''even if no products are being produced.''' This can be useful sometimes to generate Blightrot Cysts. The '''rate of Rainwater usage''' depends on the amount of workers assigned, with more workers using more Rainwater. | |||
<br /> | |||
== Blightrot == | == Blightrot == | ||
See the Main page on [[Blightrot]] for further information. | |||
== References == | |||
# Geyser chance table was datamined by @ryguy9999 on Discord. Game version 1.6.2, https://discord.com/channels/418545968666116096/884401723559538748/1319901792896811042 | |||
''Many thanks to Discord users Jhazrun, die_dai and MoronicCinamun1984 for the editing and proof-reading!'' | |||
! | |||
Latest revision as of 20:24, 21 December 2024
Overview
Viceroys can now take advantage of the Rain to power their buildings, but not without a cost! Blightrot will grow in Rain Engines as Viceroys use them, the more Rainwater that runs through an engine, the faster ![]() Blightrot Cysts will spawn. While Rainpunk is essential for any Viceroy playing on higher difficulties, it is a delicate balance between using Rainwater Engines and keeping the Blightrot at bay, as Blightrot likes to eat villagers. Blightrot scales with difficulty, so prepare to fight for your life at higher Prestige levels...
Blightrot Cysts will spawn. While Rainpunk is essential for any Viceroy playing on higher difficulties, it is a delicate balance between using Rainwater Engines and keeping the Blightrot at bay, as Blightrot likes to eat villagers. Blightrot scales with difficulty, so prepare to fight for your life at higher Prestige levels...
Types of Rainwater
There are 3 types of Rainwater: Each type will power a different type of building. ![]() Drizzle Water powers buildings that produce food,
Drizzle Water powers buildings that produce food, ![]() Clearance Water powers crafting and artistry buildings, and
Clearance Water powers crafting and artistry buildings, and ![]() Storm Water powers heavy industrial buildings that produce fuels and metals.
Storm Water powers heavy industrial buildings that produce fuels and metals.
Sourcing Rainwater
There are two ways of sourcing Rainwater:
- Collecting Rainwater from the sky via buildings such as the Rain Collector and Advanced Rain Collector.
- Building a Lua error in Module:BuildingLink at line 59: No building found with name: Geyser Pump. Please see the template documentation for how to use the parameters. on top of Water Geysers.
Rainwater Collectors
Most players will start with building a Rain Collector that collects Rainwater during the season. Collection is based on seasons, so ![]() Storm Water can only be collected during the Storm Season, and so forth. Rain Collectors have tanks with a capacity of 50 units and collect 2 units every 16 seconds, and Advanced Rain Collectors, which you unlock in later levels, has double the capacity and speed.
Storm Water can only be collected during the Storm Season, and so forth. Rain Collectors have tanks with a capacity of 50 units and collect 2 units every 16 seconds, and Advanced Rain Collectors, which you unlock in later levels, has double the capacity and speed.
Rainwater Geysers
A Lua error in Module:BuildingLink at line 59: No building found with name: Geyser Pump. Please see the template documentation for how to use the parameters. is a building you can place on top of Rainwater Geysers to collect Rainwater, they have a base capacity of 50 units, upgradable to 100 units. Geysers produce 2 units of water every 6 seconds. They have two worker slots, upgradable to place two Automatons in worker slots for uninterrupted collection. It is important to note that a Rainwater Geyser will only produce Rainwater of the type that is the colour of the geyser, it does not change with seasons.
| Small | 60% | 25% | 15% |
|---|---|---|---|
| Dangerous | 33% | 33% | 33% |
| Forbidden | 15% | 35% | 50% |
*assuming the Glade does have a Geyser
Engine Usage
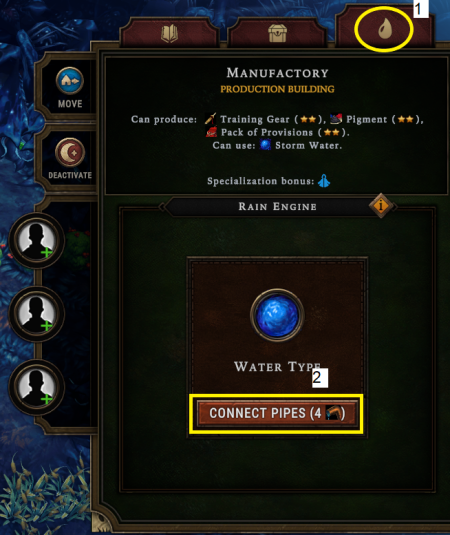
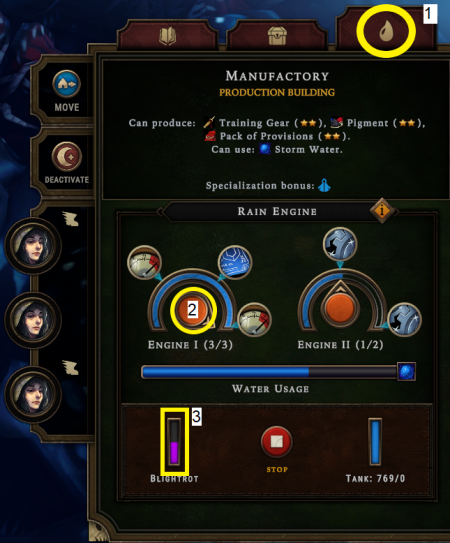
Viceroys can control how much water, and for what purpose, is used in a Building.
To the left we can see a Viceroy clicked on the 3rd panel of a Building information box to open the engine controls of a ![]() Manufactory.
We can see:
Manufactory.
We can see:
- The 3rd panel with Rainpunk Information.
- The option and cost associated with installing Rainpunk.
On the right, we see:
- The 3rd panel with Rainpunk Information.
- The Controls. Click on this button with LMB to increase, and RMB to decrease usage.
- The Blightrot meter. Viceroys can hover on this panel so see how much Blightrot is being generated.
Engine Controls are as follows:
Left: (Uses 2 Units of Water per Level per Recipe / Minute )
- 1 - Increase production speed by 50%.
- 2 - Increase chance of double production yields by 25%.
- 3 - Increase production speed by a further 50%.
Right: (Uses 1 Unit of Rainwater per Level per Worker / Minute)
It is important to note that as long as there are workers assigned and the secondary resolve-boosting engines are turned on, the Rainwater will be used and Blightrot will generate, even if no products are being produced. This can be useful sometimes to generate Blightrot Cysts. The rate of Rainwater usage depends on the amount of workers assigned, with more workers using more Rainwater.
Blightrot
See the Main page on Blightrot for further information.
References
- Geyser chance table was datamined by @ryguy9999 on Discord. Game version 1.6.2, https://discord.com/channels/418545968666116096/884401723559538748/1319901792896811042
Many thanks to Discord users Jhazrun, die_dai and MoronicCinamun1984 for the editing and proof-reading!
 Hooded Horse Wikis


