Trading: Difference between revisions
No edit summary |
|||
| Line 47: | Line 47: | ||
<br /><br /> | <br /><br /> | ||
== Standing with other Settlements / Factions == | == Standing with other Settlements / Factions == | ||
[[File:StandingLevel.png|left|border|Standing Level]] | |||
Standing (or relationship) with other Factions / Settlements '''influence how much your goods are worth to them'''. The higher your Standing with other Settlements / Factions, the more {{rl|Amber}} they are willing to pay, and the more [[Goods]] you will be able to Trade with them. | |||
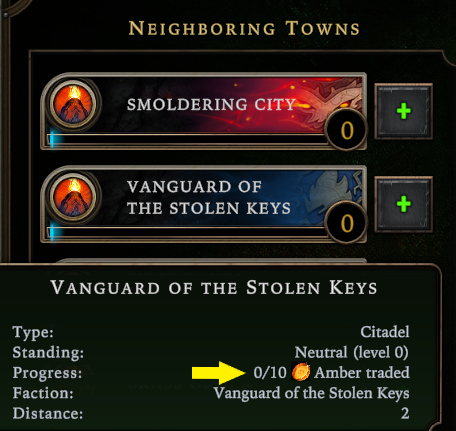
You gain Standing by initiating Trade Routes with Settlements / Factions. How much {{rl|Amber}} until your Standing improves, can be viewed by hovering over the name of the Faction / Settlement in the Trade Routes Screen and looking at the section indicated by the YELLOW arrow. | |||
==Perks== | ==Perks== | ||
Revision as of 13:43, 8 December 2023
Overview
Trading is a way to exchange ![]() Amber for Goods, and vice versa. You can do this through Traders or Trade Routes.
Amber for Goods, and vice versa. You can do this through Traders or Trade Routes.
Traders
Visit Trader_Wares to see a comprehensive list of Traders and their wares.
Traders will start arriving once you build the Trading Post. There are 2* regular Traders arriving every 12 minutes. The first Trader will arrive in 8:30 minutes if you build the Trading Post immediately upon the start of your settlement. There are 3 Glade Traders which can sometimes be found in Glades on the map.
Building the Trading Post
You can find the Trading post in the  City Buildings tab. It requires 10
 ![]() Wood to build.
.*This increases to 8 Traders once you have all the Upgrades unlocked.
Wood to build.
.*This increases to 8 Traders once you have all the Upgrades unlocked.
Trading with Traders
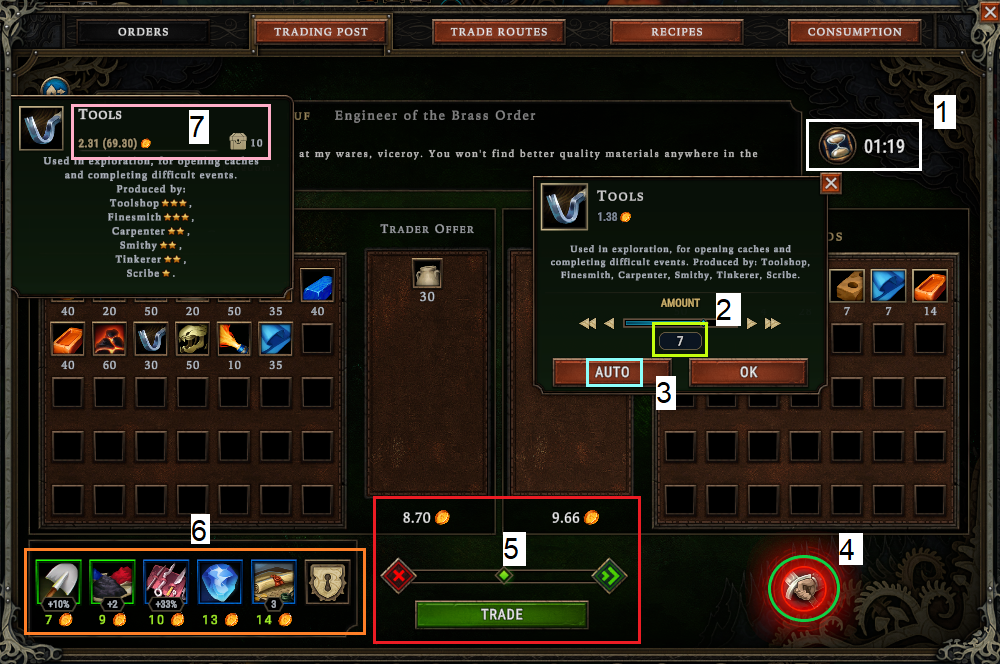
Once the Trader has arrived, we can click on their icon or the Trading Post to be directed to the Trading Screen, as seen below:
- In WHITE, we see the amount of time the Trader will stay in the settlement, available to trade.
- In NEON GREEN, we can type in the amount of goods we are trading. We can also click on the arrows to increase or decrease by 1.
- In NEON BLUE, we see the "Auto" function. Clicking this function will have the Trader automatically calculate the amount of goods needed to make the trade acceptable to them.
- In GREEN on the bottom right, we see the "Assault the Trader" option. See Assualting Traders for more information.
- In RED on the middle of the screen, we see visually by how fair the deal is to us or the [{Trader]], deals will only be accepted once the button is in the middle of the bar. If the button is too far right and the bar is green, you are getting ripped off.
- In ORANGE on the left, we see the Perks and Cornerstones the Trader sells, and for how much.
- PINK we can see what 1 unit of a Good is worth, how much the stack is worth in (brackets) and how many we have in our Warehouse by the
 . You need to HOVER over the image of the good to get this tooltip.
Trade Routes
Trade routes are a way for you to trade your Goods for {{rl|Amber]] when the Trader is not at the Settlement. As you build up the relationship (standing), you will get more ![]() Amber for your goods. This is the most profitable way to earn
Amber for your goods. This is the most profitable way to earn ![]() Amber for your goods
Amber for your goods
You need ![]() Pack of Provisions to trade via Trade routes.
Pack of Provisions to trade via Trade routes.
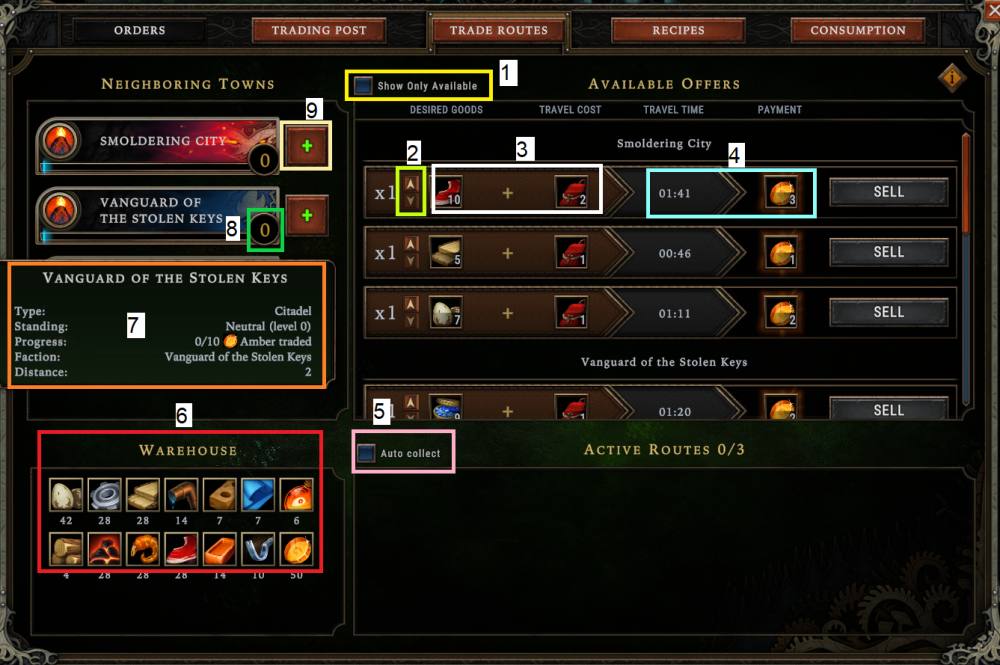
- In YELLOW, is the option to show all Trade Routes, or only Trade Routes you're currently able to fulfill.
- In NEON GREEN, we see buttons to increase or decrease the amount of Goods we're willing to Trade.
- In WHITE, we see the total Goods and
 Pack of Provisions we are trading.
 - In NEON BLUE, we see the amount of time until we get paid for this Trade Route, as well the amount of
 Amber we are recieving for it.
 - In PINK, we see the option to collect the
 Amber from a completed Trade Route as soon as it completes, or to wait until we manually complete it. Please see Trade Routes Strategy on why you would use this option.
 - In RED, we see which Goods we currently have in our Warehouses
- In ORANGE, we see our current Standing Status with a settlement. Read more about this by clicking on Standing Status.
- In GREEN, we see our current Standing with another Settlement / Faction.
- In BEIGE, we see the option to buy another Trade Route Option Slot from a specific Faction / Settlement.
Standing with other Settlements / Factions
Standing (or relationship) with other Factions / Settlements influence how much your goods are worth to them. The higher your Standing with other Settlements / Factions, the more ![]() Amber they are willing to pay, and the more Goods you will be able to Trade with them.
Amber they are willing to pay, and the more Goods you will be able to Trade with them.
You gain Standing by initiating Trade Routes with Settlements / Factions. How much ![]() Amber until your Standing improves, can be viewed by hovering over the name of the Faction / Settlement in the Trade Routes Screen and looking at the section indicated by the YELLOW arrow.
Amber until your Standing improves, can be viewed by hovering over the name of the Faction / Settlement in the Trade Routes Screen and looking at the section indicated by the YELLOW arrow.
Perks
Lua error in Module:PerkSearchResultsView at line 85: attempt to concatenate local 'borderColor' (a nil value).
Trivia
- Effects that reduce the Waiting time for Traders to arrive cannot reduce the Time between Traders to below 3:15
- Perks that give Bonuses for trading Amber Value do not take Amber spent on Perks, Blueprints and Cornerstones into account.
 Hooded Horse Wikis


